E-exams with the Moodle quiz activity
The following instructions describe the preparation, the implementation itself and the follow-up of e-exams via the Moodle quiz activity.
Answer-choice items in the test are automatically evaluated after submission. Like open questions, they can also be evaluated manually. Once created, questions are stored in the question bank and can be reused as often as required.
Preparation
Create a quiz
The quiz is a Moodle activity that you can create in a course. To do this, you need instructor permissions within a course.

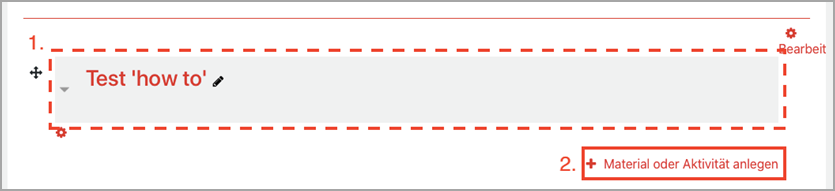
4. You will now reach the configuration menu of the quiz activity. To create this, you must now assign at least one freely selectable name and save the settings.

5. The activity has now been created in the course:
Recommended minimum settings
Usually, the following setup is desired for an exam:
The exam is to be available from a certain time x. The generation of solutions is planned for a processing time y. After the end of the processing time (incl. buffer times) no more attempts shall be possible. In order to submit a solution, a declaration of independence is to precede it. Initially, the students shall not be given access to the evaluation of the exam.
Preconfigured settings are marked in blue in the figures.
1. You are on the course interface, navigate to the quiz you want to configure and select it by clicking on the quiz name.
2. In the quiz overview you will find the action menu of the activity (red cogwheel) in the upper right corner. Click it and select “Edit settings“.

3.You are now back in the familiar settings screen of the quiz.
4. Below the name of the quiz you will see a description field. Here you can display organizational processes, for example.

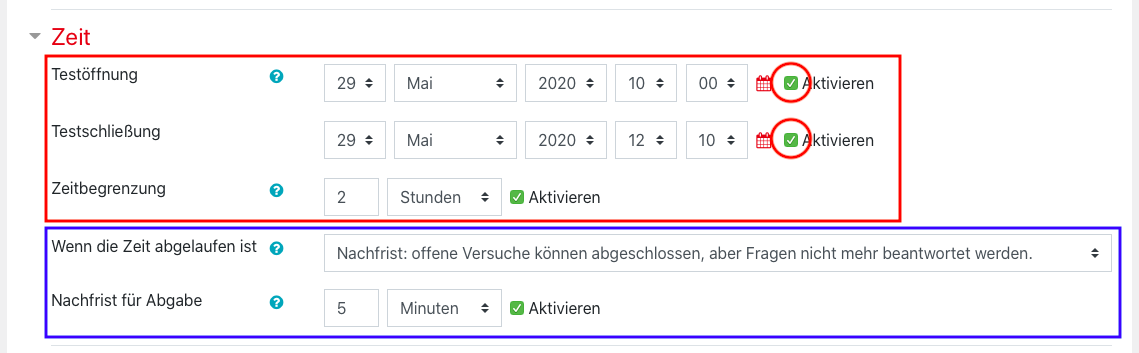
5. In the ” Timing ” section, you can regulate the start and end of the exam time. ” Open the quiz” describes the time when the test is unlocked for the participants. Under “Close the quiz“, the end of the processing time should be defined including a time buffer of 5-10 minutes (to compensate for technical differences/loading times). Under “Time limit” you can specify the exact processing time for the exam. The grace period is also used to compensate for loading times and should be set to 5-10 minutes.
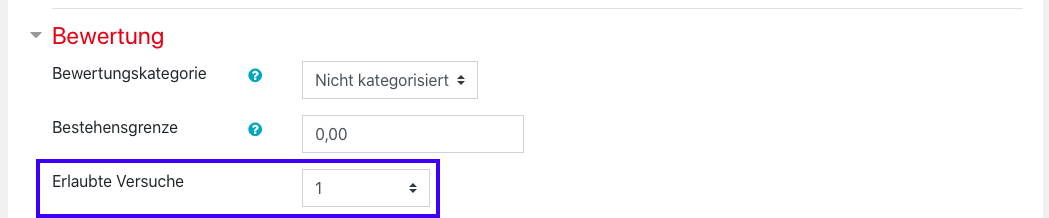
6. Under ” Grade” you will find the number of allowed attempts. If a quiz is to be repeatable, simply adjust the ” Attempts allowed” option accordingly.
7.The “Layout” regulates the display and navigation of the exam. For technical reasons, it is recommended to display only one task per page.

8.Under “Question behavior” you can regulate the evaluation of the exam. If an immediate evaluation of the tasks within the processing time is desired, the “Question behavior” option must be adjusted accordingly.

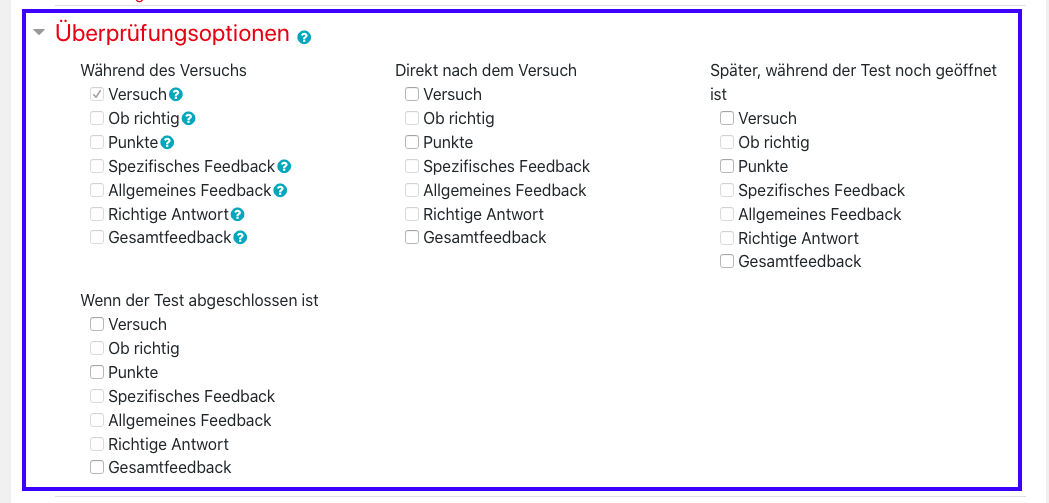
9. The “Review options” control when which evaluation criteria should be displayed. By default, all values (except ” The attempt” under “During the attempt” are deactivated). You can adjust the review options at any time and unlock viewing afterwards.
10. “Extra restrictions on access” contains the option of defining a password that will be requested when the quiz is started. Furthermore, you can activate the declaration of autonomy under “Students cognisance of plagiarism policy “. This must then be confirmed in order to start a quiz.

11. Via “Save and return to course” your settings will be saved and you will be redirected to the course view. Via “Save and display” you will be taken directly to the quiz overview.
Fill quiz with questions
Once the quiz activity is created, you can now fill it with questions in various ways.
1. Navigate to the quiz in your course and open it by simply clicking on the name. In the quiz overview you will find the action menu of the activity (red cogwheel) in the upper right corner. Click on it and select “Edit settings“. Alternatively, if the quiz is empty, you can simply click the “Edit quiz” button.
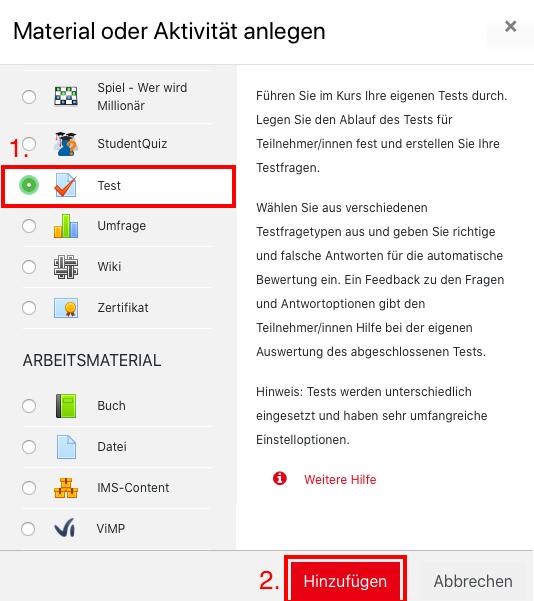
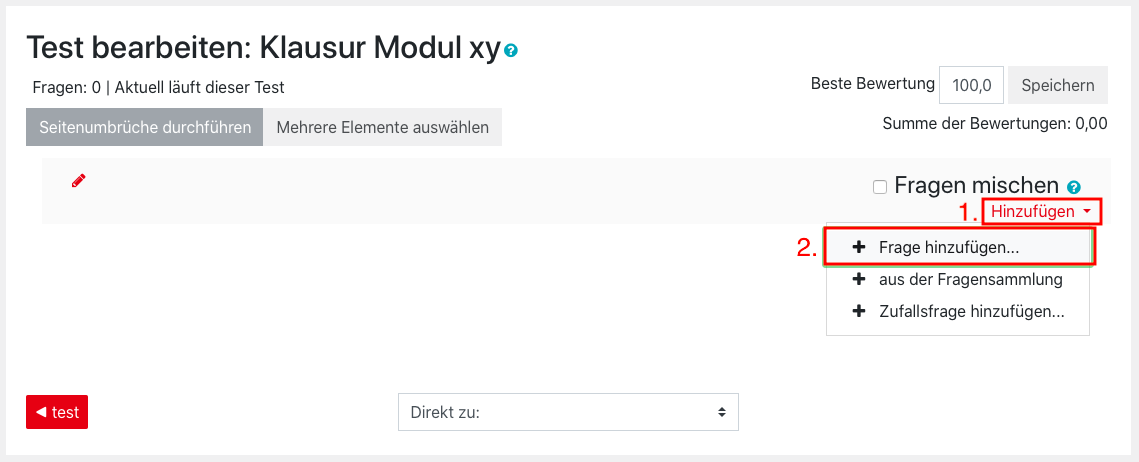
2. You are now in the empty editing screen of the quiz. You have various options for adding questions to your quiz via the “Add” button.
3. If you do not yet have a question pool on Moodle, or if a question is not yet in the question pool, you can create a new task via “Add” –>”A new question“.
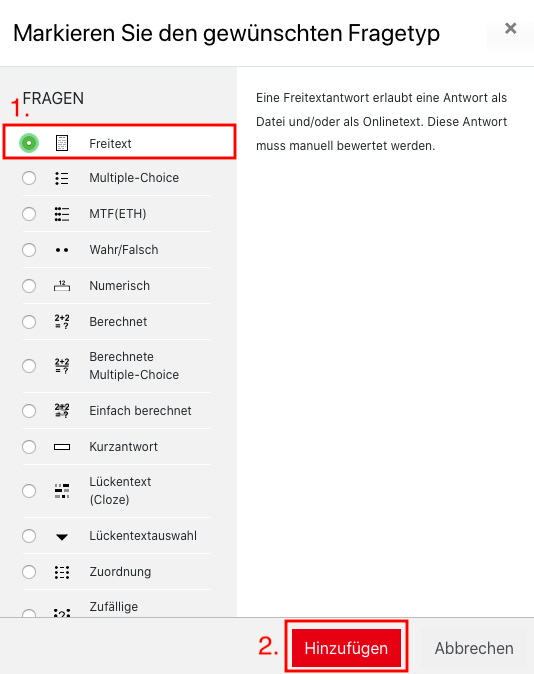
For this purpose, different question types are available, which you can add and set up by selecting them.
Tip: You can find more info about each question type in the MoodleDocs.
4. If there are already questions in the question bank, you can access them directly in the quiz.
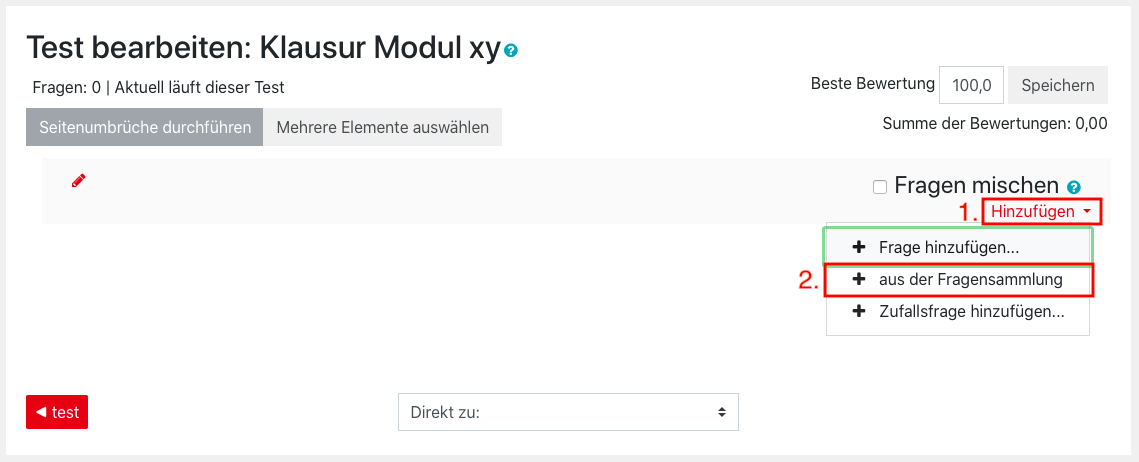
First, select the category of the question bank from which you want to add questions. The questions there are displayed and can be selected in full or in part. Once you have made your selection, the questions are added to the quiz by clicking on “Add selected questions to the quiz“.

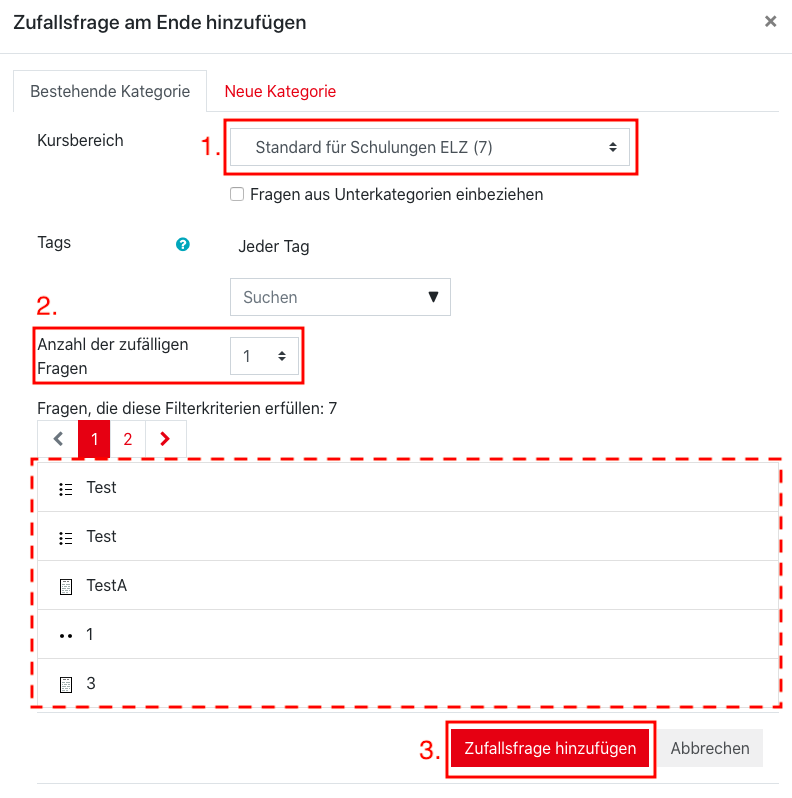
5. It is also possible to configure the quiz with random questions from the question bank.
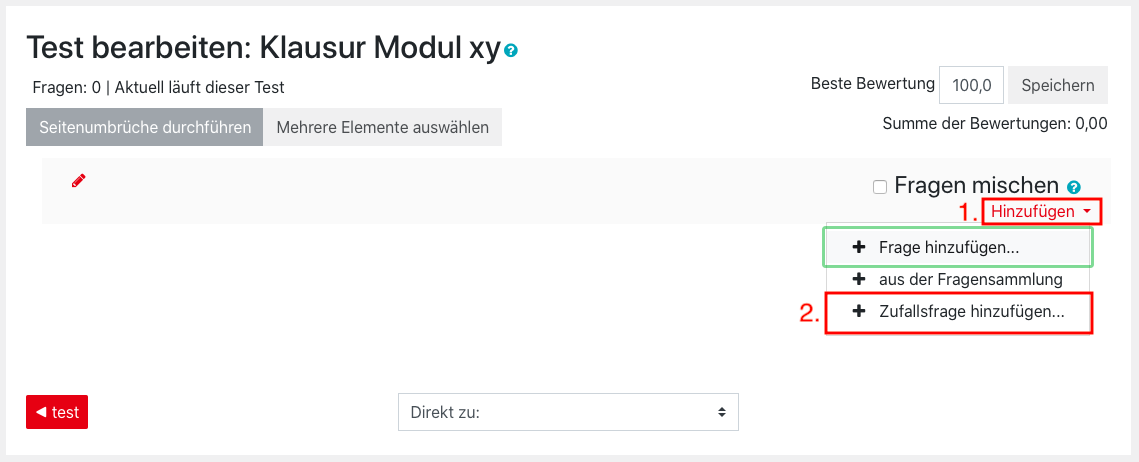
Here you select the category of the question bank from which random questions should be selected. In the next step you set how many random questions should be drawn from the question pool. In the lower part of the window you will get an overview of the questions that can then be randomly selected. Via “Add random question” you finalize the selection.
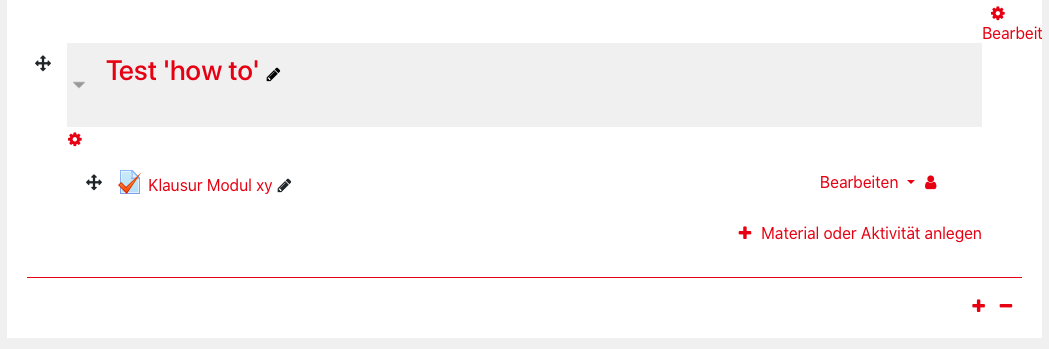
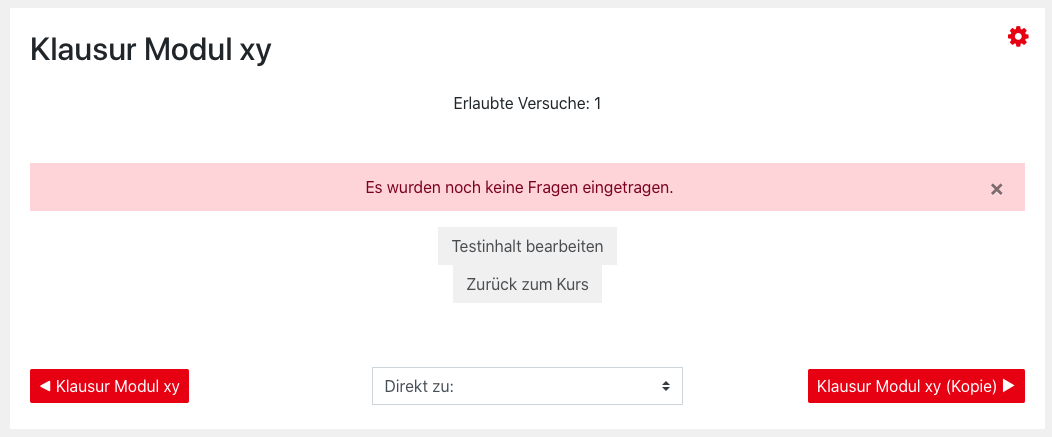
6. The quiz content is then displayed in edit mode as following:

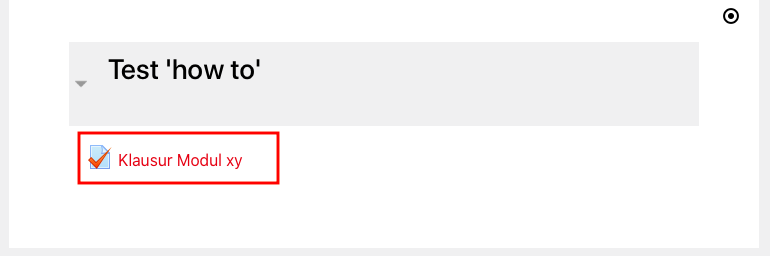
7. The view of the quiz overview is displayed for you and the students as shown.

Open the quiz only for a selection of participants
You can also use the group function in Moodle to open the quiz to a specific group of students only. This is useful, for example, for make-up exams, cancellations or group exams. To create and define a group, proceed as described below:
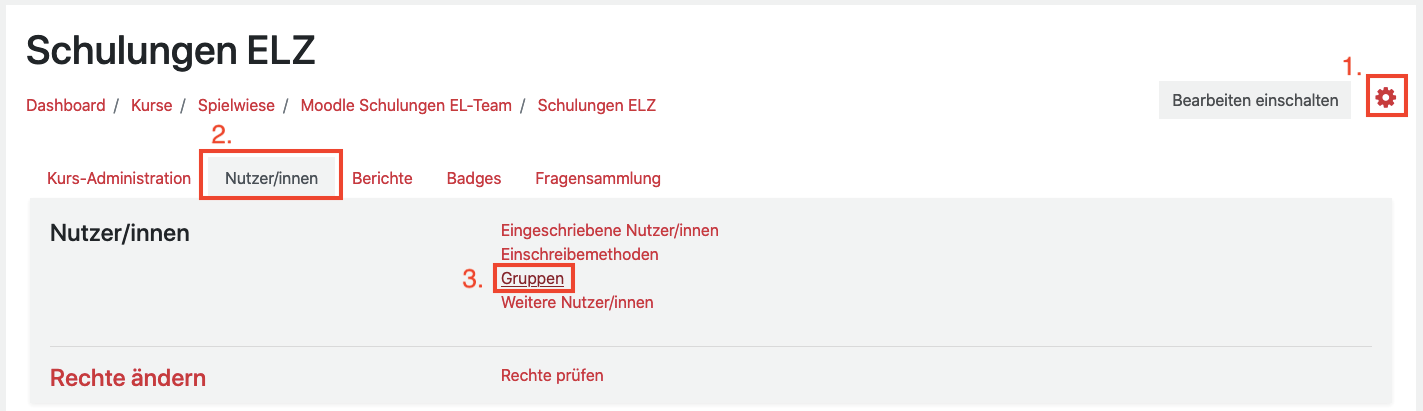
1. Go to the desired course and click on the course action menu (red cogwheel) to the right of the “Turn editing on” button. In the menu that appears, select the “Users” tab and click on the “Groups” menu item.
2. In the following window click the “Create group” button.

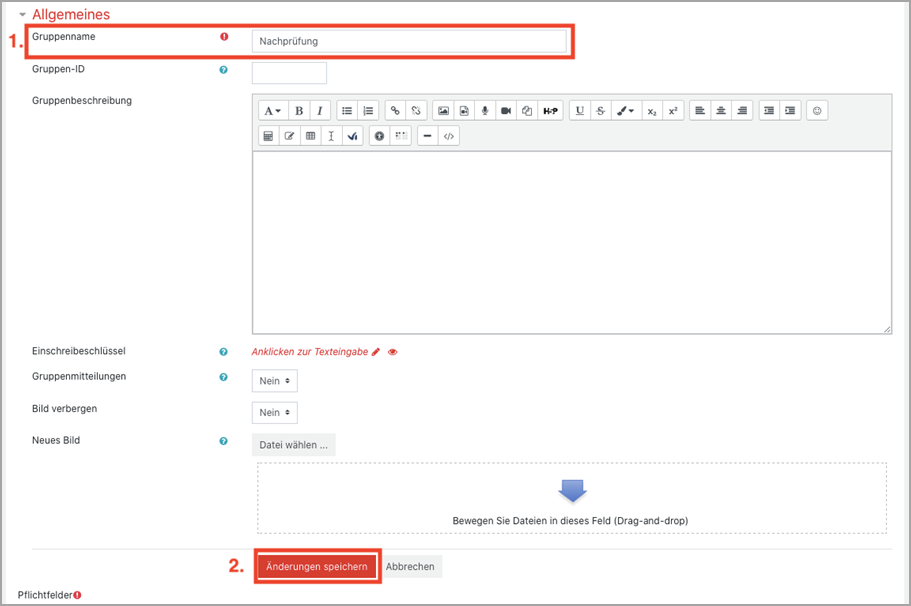
3. On the following page you assign a name for the group, no further settings have to be made, and close via “Save changes“.
4. You will return to the group overview and see the group you just created in the left field. In order to assign participants to the group, click on the corresponding group (it will change color) and select the button “Add/remove users” below the right field of the group overview.
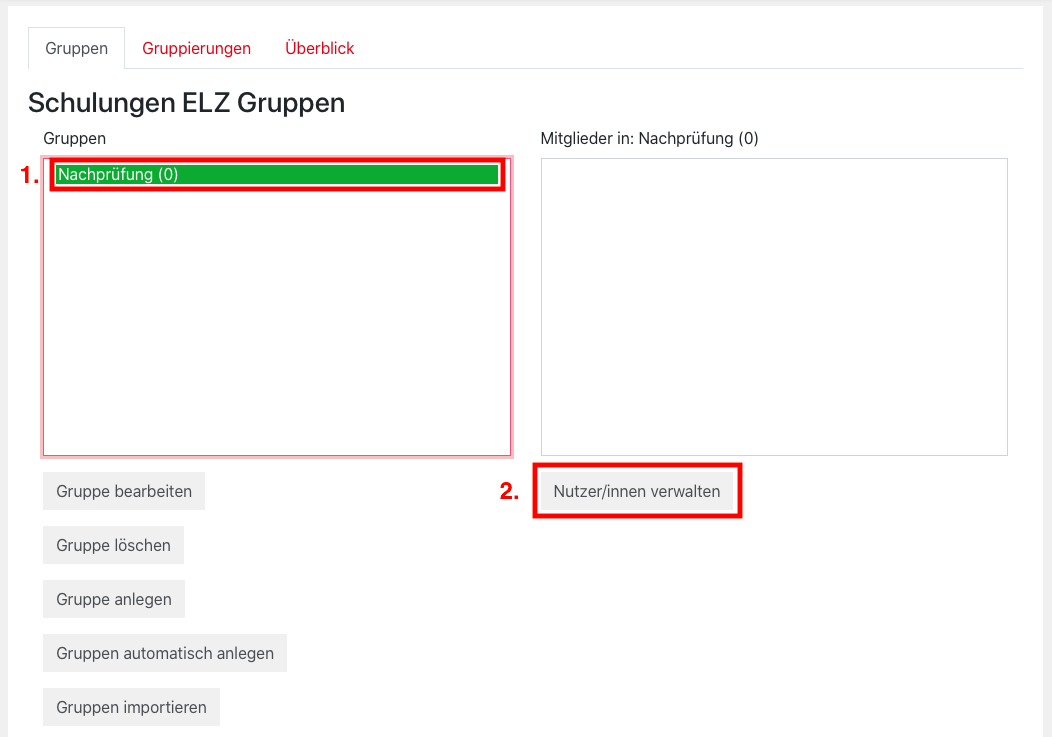
5. In the following overview you can see all course participants in the right field. Here you select the desired people by clicking on them (selected entries are colored) and add them to the group via the “Add” button. Members of the group are then displayed in the left field. Saving is not necessary here.

6. Now go back to the course interface and navigate to the quiz that should get a group constraint and select it by clicking on the task name.
7. In the quiz overview you will find the action menu of the quiz in the upper right corner (red cogwheel). Click it and select “Edit settings“.
8. You are now back in the familiar settings screen of the quiz. Scroll to the “Restrict access” menu item and select “Add restriction“. In the next window, select “Group“.
9.A new condition for groups appears. In the selection list you can now define the group. In link with a start date, please make sure that the conditions are linked accordingly.

10. Save your settings.
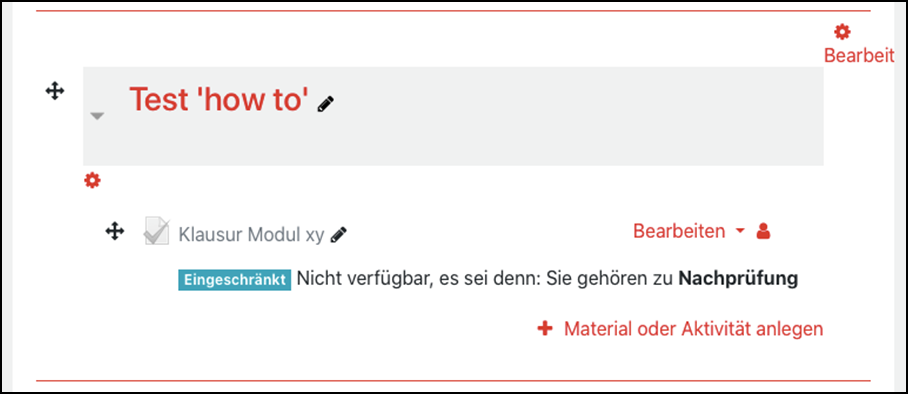
11. The course view looks as follows under the settings made:
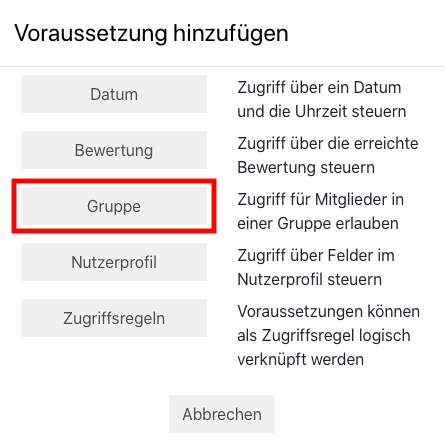
Set disadvantage compensation (time extension)
1. Navigate to the course and open the relevant quiz with a single click on the name.
2. In the subsequent window, click on the action menu of the test in the upper right corner (red cogwheel). In the “Quiz administration“, select the “User overrides” element.
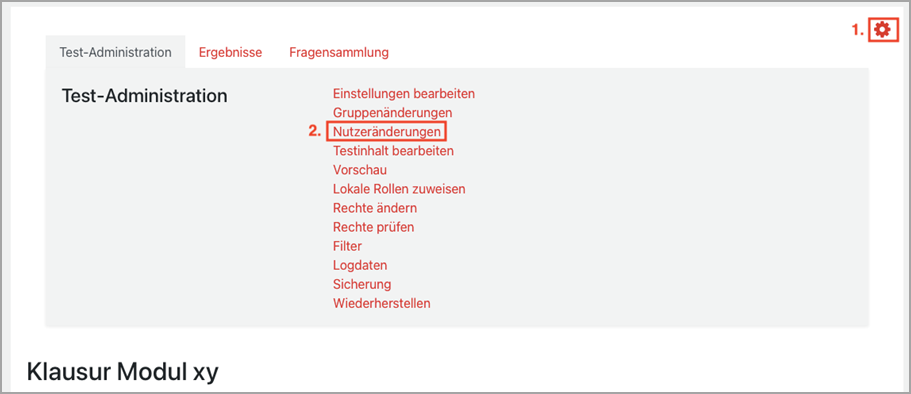
3. In the next window, click on “Add user override” to store a disadvantage compensation.

4. You can now search for an affected person via the search field and select him/her with a click. Furthermore, you have the option here to adjust the time availabilities as well as the number of attempts individually for this affected person. End the process via “Save” or add another disadvantage compensation via “Save and enter another override“.
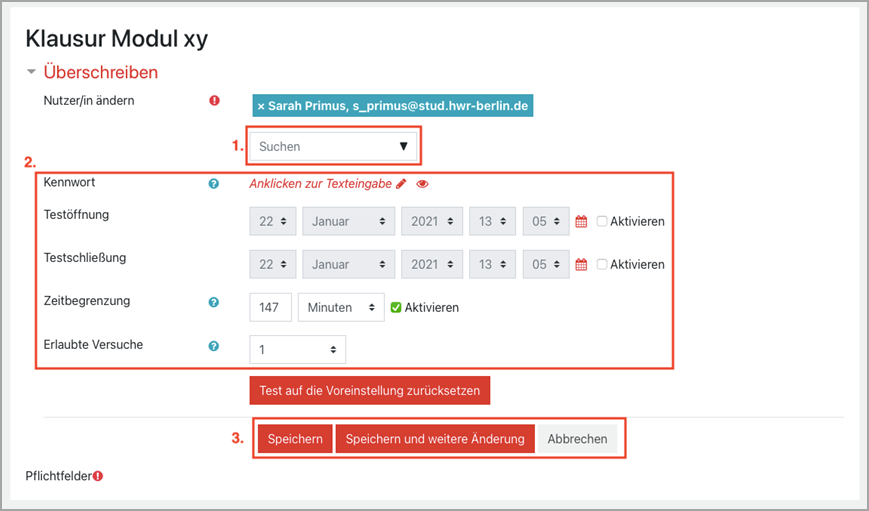
5. You will get an overview of all created user changes.
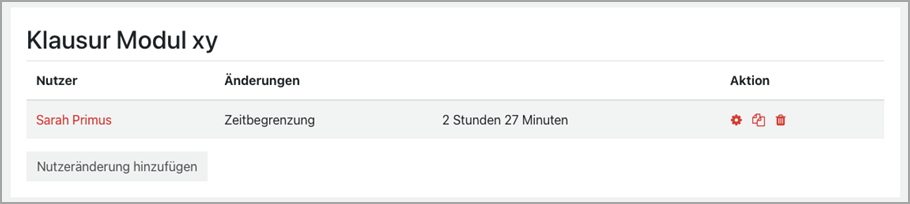
6. The user changes can be deposited both before the e-examination and during it. A change made during an exam can be used to grant bonus time (e.g. in the event that a candidate has a technical problem). It is important to note, however, that the subsequent adjustment is not updated for the student until he/she has requested a new quiz page.
Implementation
At the beginning and during the exam, you usually do not need to do anything else. However, it may happen that students have questions. It is recommended to keep a communication channel open for the exam, e.g. an open BigBlueButton room or a forum in the Moodle course.
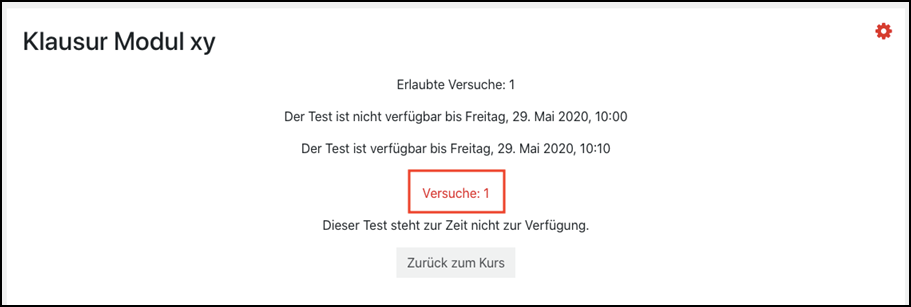
In the quiz overview you can see the number of tests. Select “Attempts: x” here to get a detailed view of all quiz attempts. Here you can see when someone started the quiz and also if there are already completed quizzes.
Follow-up
View submission
- You are on the course interface, navigate to the quiz you want to configure and select it by clicking on the quiz name.
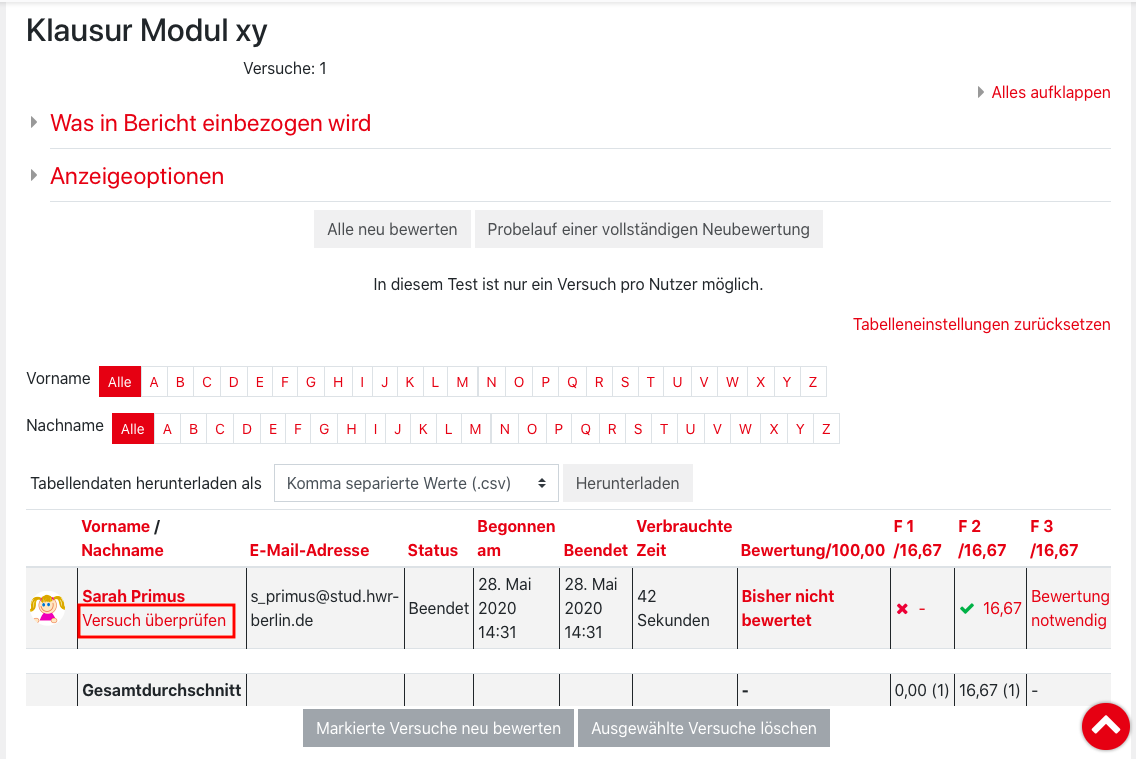
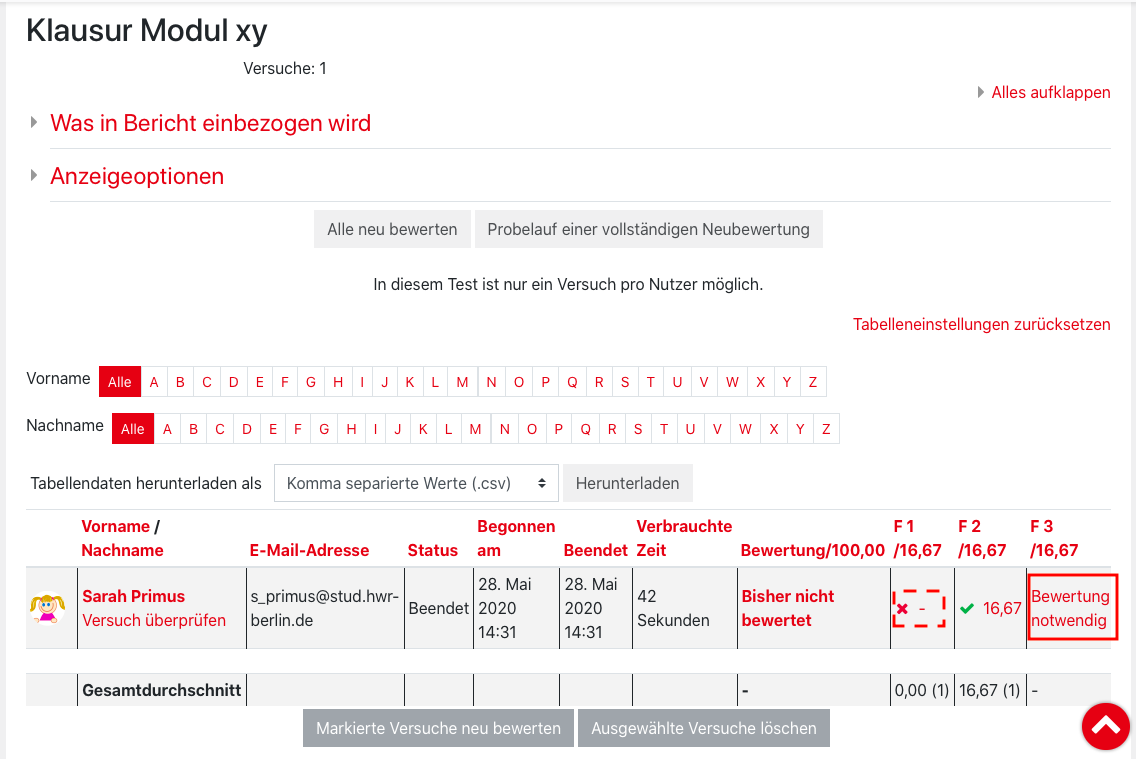
2. In the quiz overview, click on the red link ” Attempts: x” or open the “Results” tab in the quiz administration and select the ” Grades” button.

3. The grading summary opens. You will now see the following list with information e.g. about the start and submission of the quiz. If question types of the answer-choice method were selected, you will directly see the automatic evaluation of these tasks. For all other tasks, the text “Requires grading” appears first, which will later be replaced by the corresponding points.

4. If you would like to take a closer look at an attempt, select “Review attempt” under the name of the corresponding student.
5. You will receive an overview of the student’s attempt including submitted solutions to the individual questions along with log data.
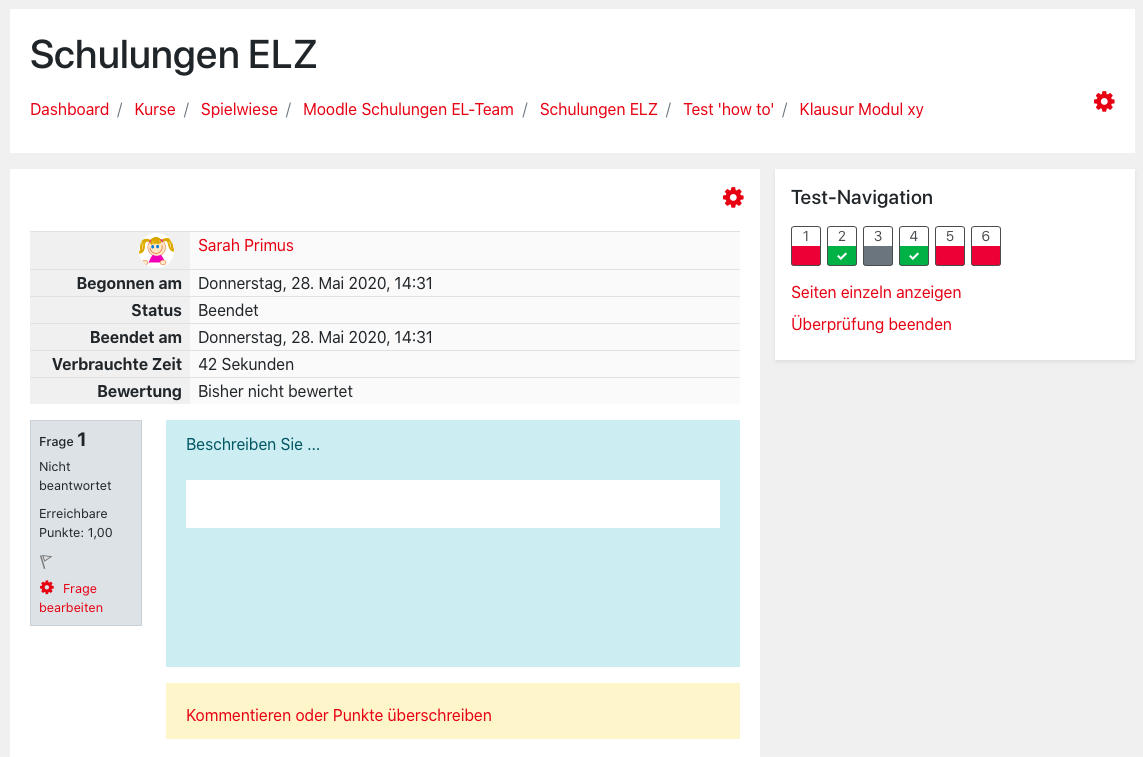
6. Furthermore, you can take a closer look at individual questions of an attempt by clicking directly on the evaluation of the task in the corresponding row and column or on “Requires grading“.
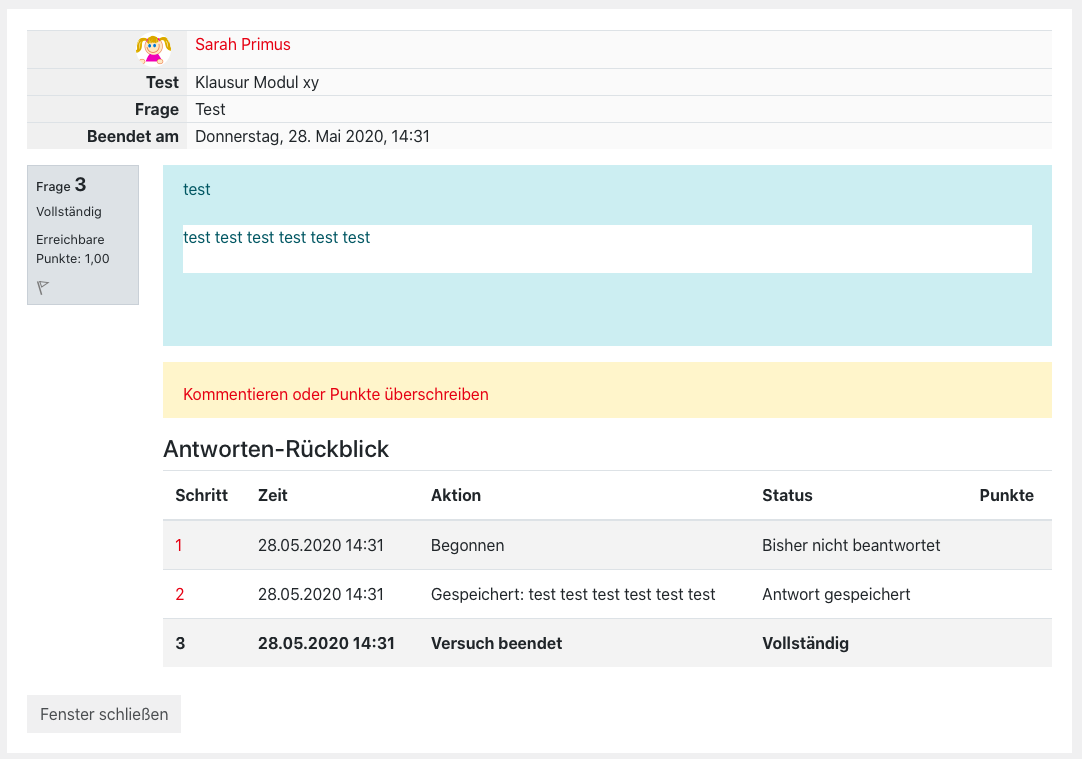
7. You will receive an overview of the student’s selected question along with the submitted solution and log data.
Reusing a test or question bank in another course
Reusing a test or question bank in another course
You can reuse a test or the question bank of a course in other courses once it has been created. This works as following:
1. Navigate to the course where you want to copy a quiz/ a question bank.
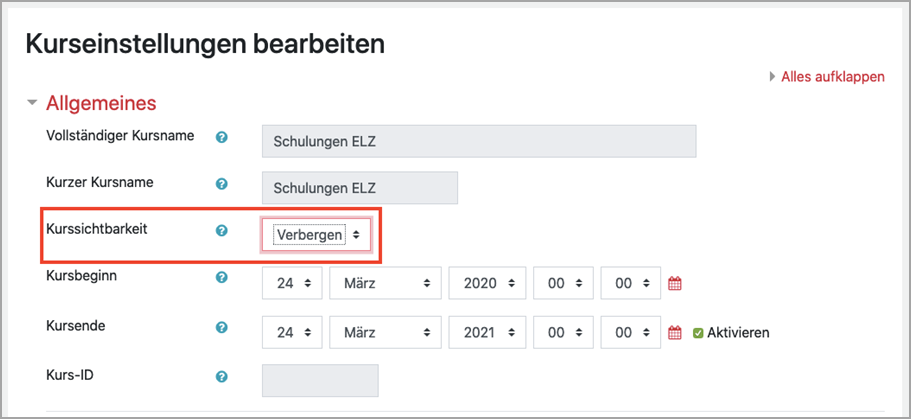
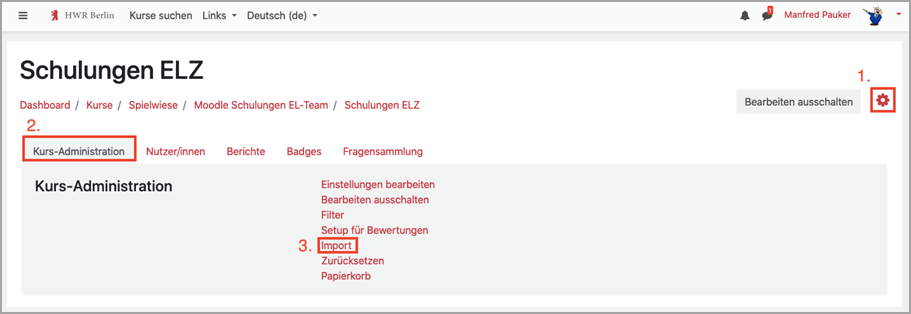
2. Set the course to “Hidden” for the time of the copy process. To do this, open the course administration (red cogwheel at the top right) and select the “Edit settings” option under the “Course administration” tab.

3. Here, go to “Course Visibility” and select “Hide” from the drop-down list.
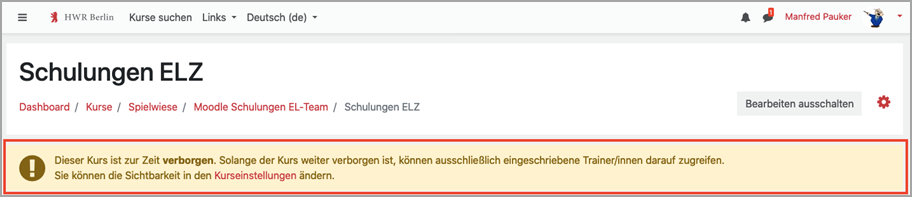
4.Back on the course overview, you will now see a banner regarding the course visibility.
5. Open the course administration again and select “Import” under the “Course administration” tab.
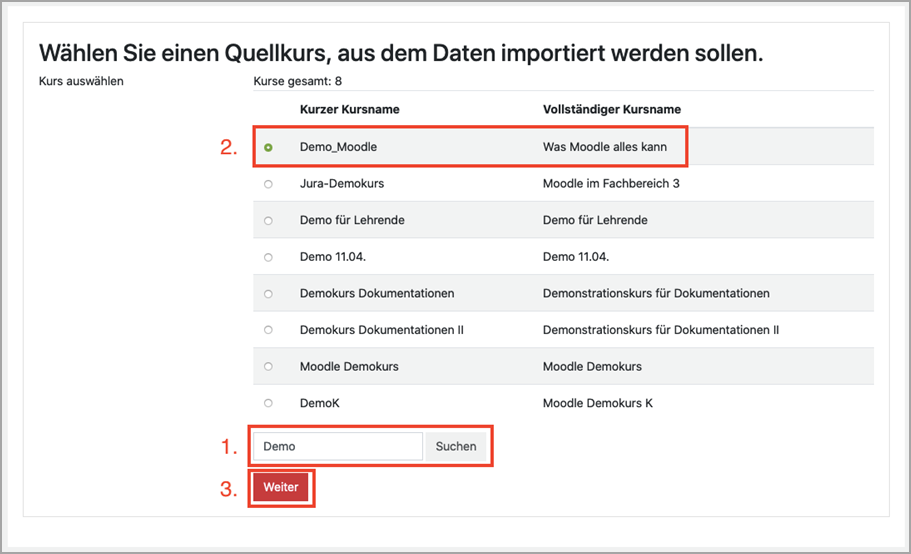
6. In the following window, select the source course using the search field and then select the corresponding course from the list. Go on with ” Continue “.
Open the source course in advance in another tab, copy the course short name and paste it into the search field.
7. Now select what you want to import. For a quiz without a group requirement, the options “Include activities and resources” and “Include question bank” are recommended. If you only want to import the question bank, remove all check marks except for “Include question bank“. Confirm your selection with “Next“.

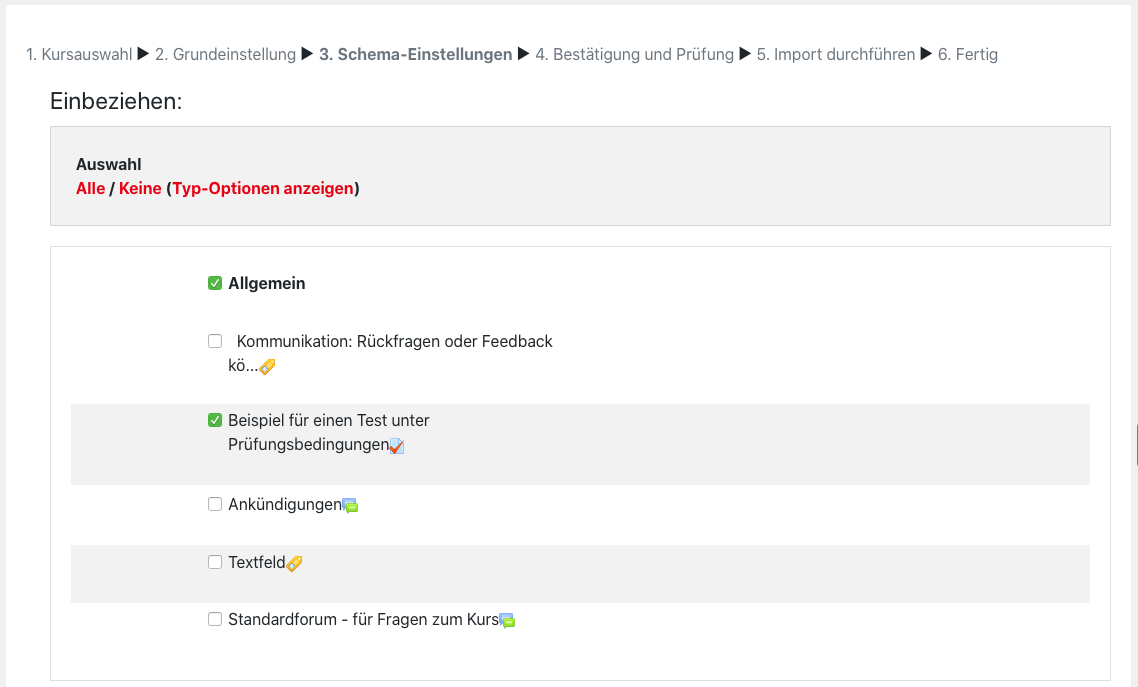
8. Next, you can select the activities/work materials you want to copy. Here you should select a quiz. If you import only a question bank, you can deselect everything. Via “Next” you get to the item “Confirmation and review“.
9. In the next step you will get a summary of your selection. Via the button “Perform import” the copying process is started.

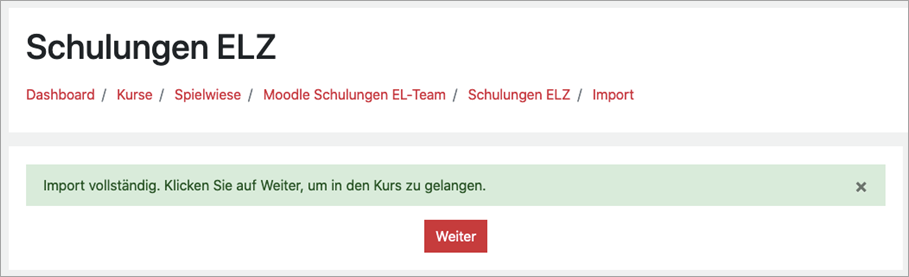
10. The selected elements are now copied to the target course. If the import was successful, you will receive the following message. Confirm this with “Next“.
11. If necessary, now adjust the time settings of the quiz accordingly (see Recommended minimum settings).
12. Make the course visible again. To do this, you can follow steps 2 to 3 analogously, or click on “Settings” in the hint banner.
Export selected question categories (incl. questions)
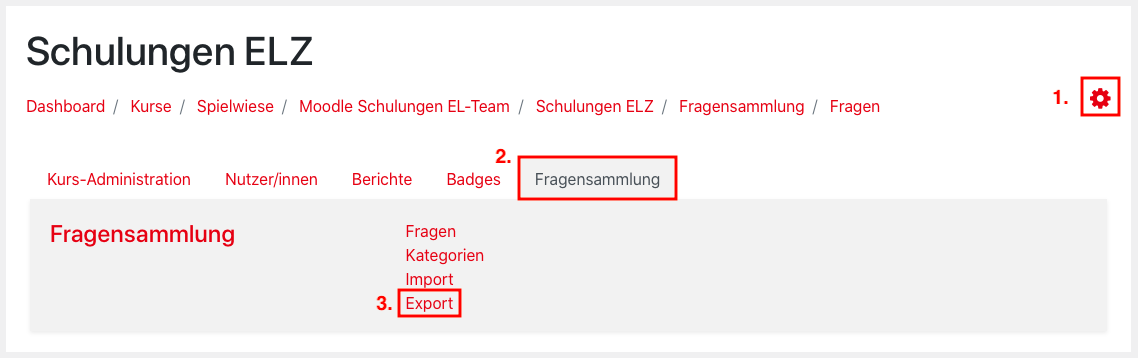
1. Navigate to the course from which you want to export selected question categories.
2. Open the course administration by clicking on the red cogwheel on the right side of the page and select the tab “Question bank” here. Click on the “Export” option here. A new window will open.
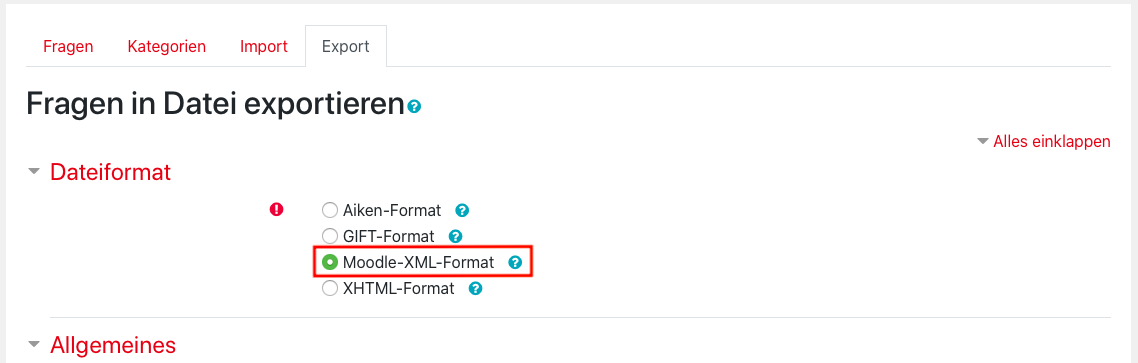
3. Under the menu item “File format” you specify “Moodle XML format“.
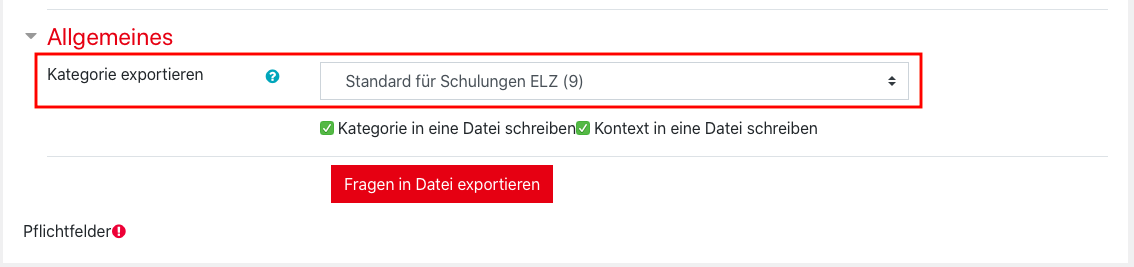
4. Under the “General” menu item, select the category you want to export.
The categories of the question bank are hierarchically structured. You can imagine this like a folder structure on the computer. If you copy a parent folder, it will automatically contain all subfolders. It is the same with the categories of the question collection. The category “Superior for course xy” contains all questions of the subcategories. Subordinate categories are displayed indented in the dropdown field.
5. If you want to take over the categorization of the questions themselves, please put a check mark in front of “Write category to file“. Otherwise, all questions will be saved in one and the same category during import.
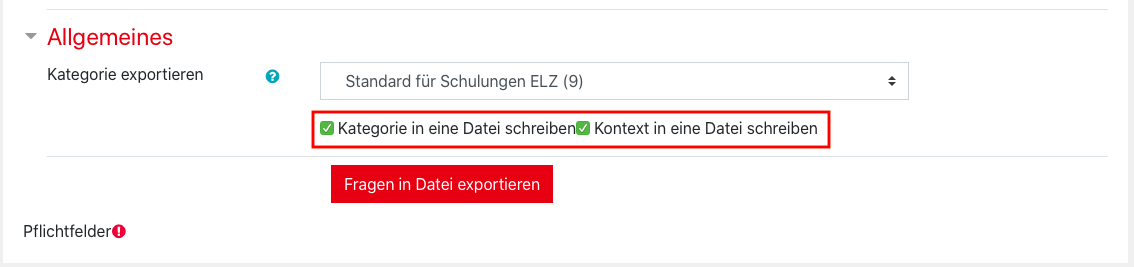
6. Select “Export questions to file“. After a short waiting time you will finally receive an .xml file via download.

Import selected question categories (incl. questions)
1. Navigate to the course from which you want to import selected question categories.
2. Open the course administration by clicking on the red cogwheel on the right side of the page and select the “Question bank” tab here. Click on the “Import” option here. A new window will open.

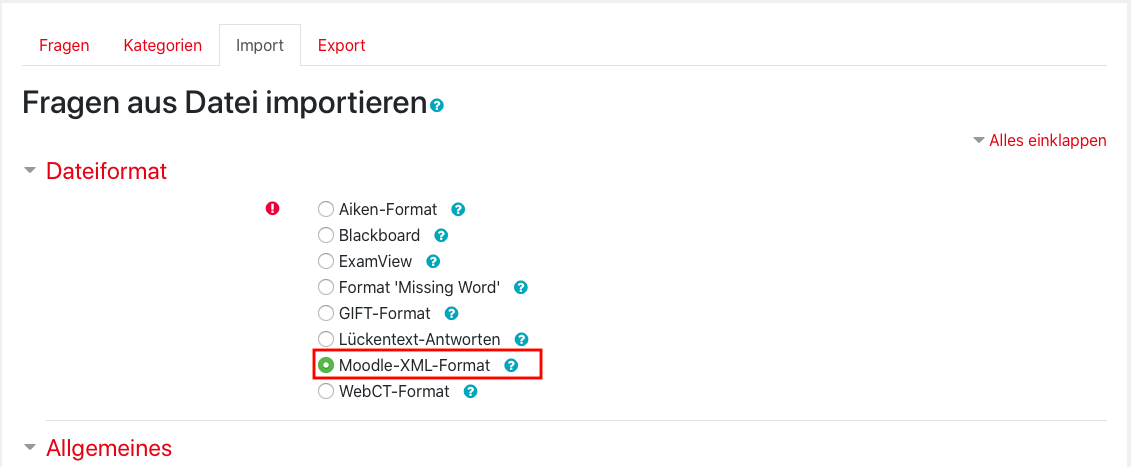
3. Under the menu item “File format” you specify “Moodle XML format“.
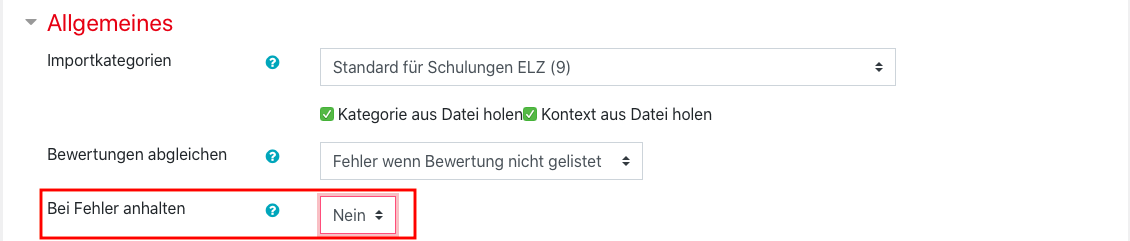
4. Under the “General” menu item, select the category into which the selected question categories are to be imported.
The categories of the question bank are hierarchically structured. You can imagine this like a folder structure on the computer. If you copy a parent folder, it will automatically contain all subfolders. It is the same with the categories of the question collection. The category “Superior for course xy” contains all questions of the subcategories. Subordinate categories are displayed indented in the dropdown field.

5. If you want to take over the categorization of the questions (from the import file) per se, please set a check mark in front of “Get category from file“. Otherwise, all questions of the selected category will be saved during import.

6. Choose “Stop on error” “No”.
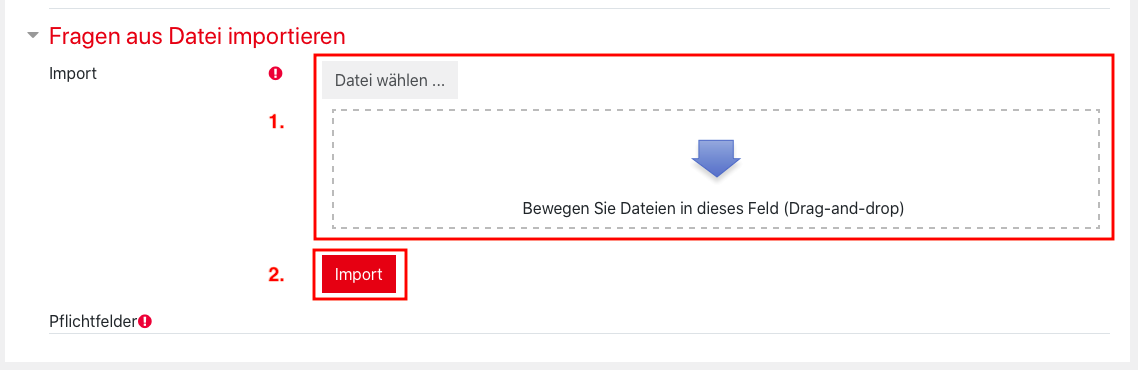
7. Under the “Import questions from file” menu item, select your import file in .xml format and confirm by clicking “Import“.
8. You will get a summary about the import process and you can finish it by clicking the “Next” button.
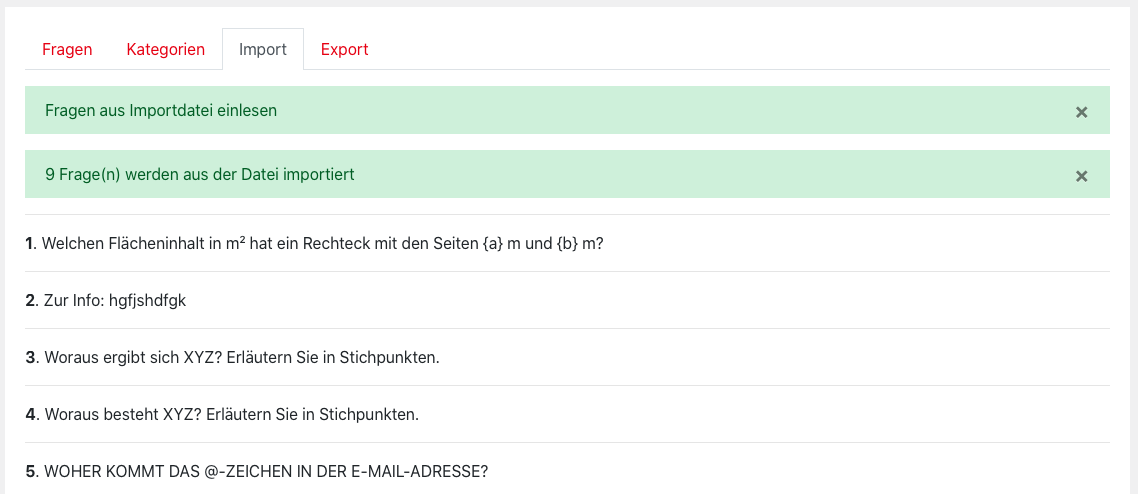
9. The selected question categories including questions should now be in the question bank of the current course.
Export individual questions from the question bank
1. Navigate to the course from whose question bank you want to export individual questions.
2. Open the course administration by clicking on the red cogwheel on the right side of the page and select the tab “Question bank” here. Click on the “Questions” option here. A new window will open.

3.Select the category in which the questions you want to export are located.
4. Select the “Edit” button behind the desired question and “Export as Moodle XML” in the new context menu.

5. You will then be provided with an .xml file via download.
Import individual questions from the question bank
Archiving
You have the option to export all test attempts incl. comments and assessments from Moodle and save them as a PDF document.
Furthermore, you can also download the tabular test view as an Excel file and thus convert the point-by-point assessment into an editable format.
Export quiz attemps as a PDF document
1. To start archiving, navigate to the course where the corresponding quiz activity is located.
2. Open the quiz activity with a left click.
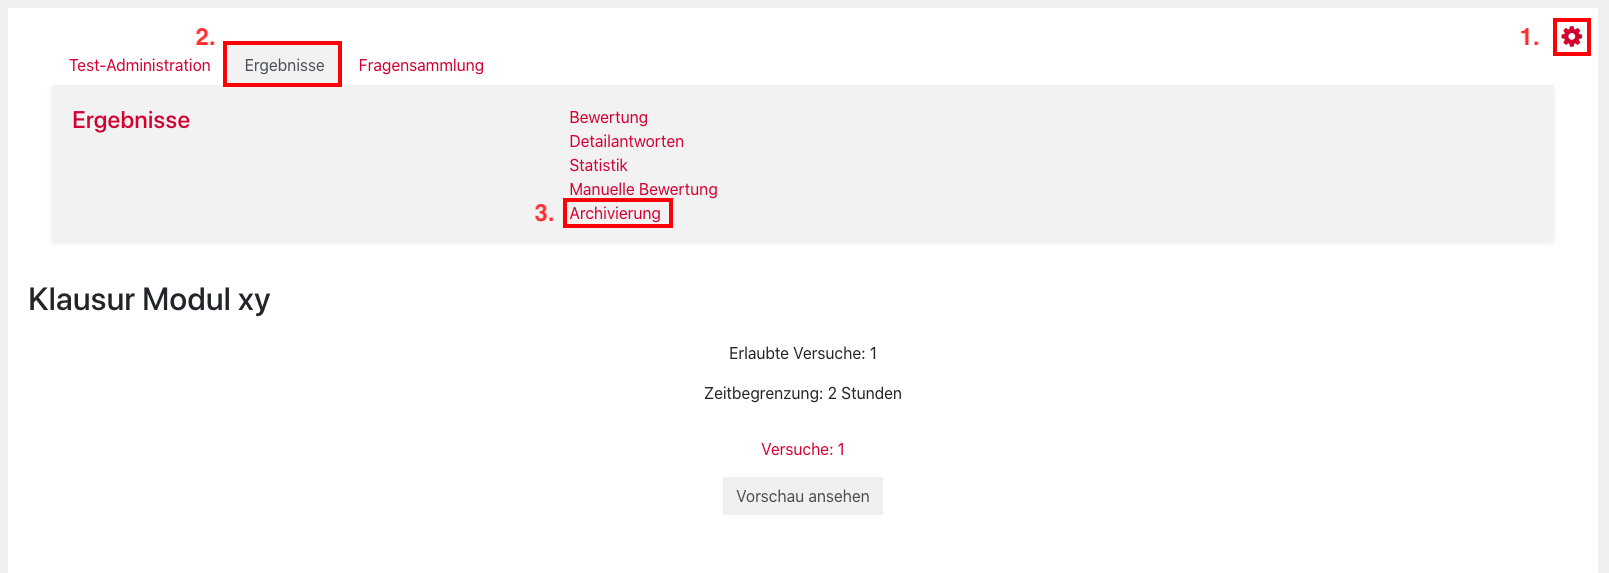
3. In the following window, open the quiz administration via the red cog wheel. Switch here to the “Results” tab and click on the ” Archive” option.
4. All attempts will now be loaded one after the other in your browser window. Please wait until the loading process is completed. Depending on the browser, you can recognize this e.g. by the loading display of the tab. You will get the most optimal display via Google Chrome and Firefox.
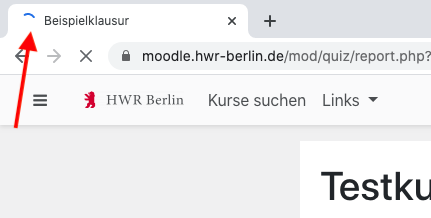
a. Google Chrome
5. Use the key combination CTRL + P or right click + “Print…” in the browser window to open the print menu.
6. Select here “Save as PDF” or alternatively a PDF printer (e.g. Microsoft Print to PDF).
7. Activate the “Headers and footers” and “Background graphics” options
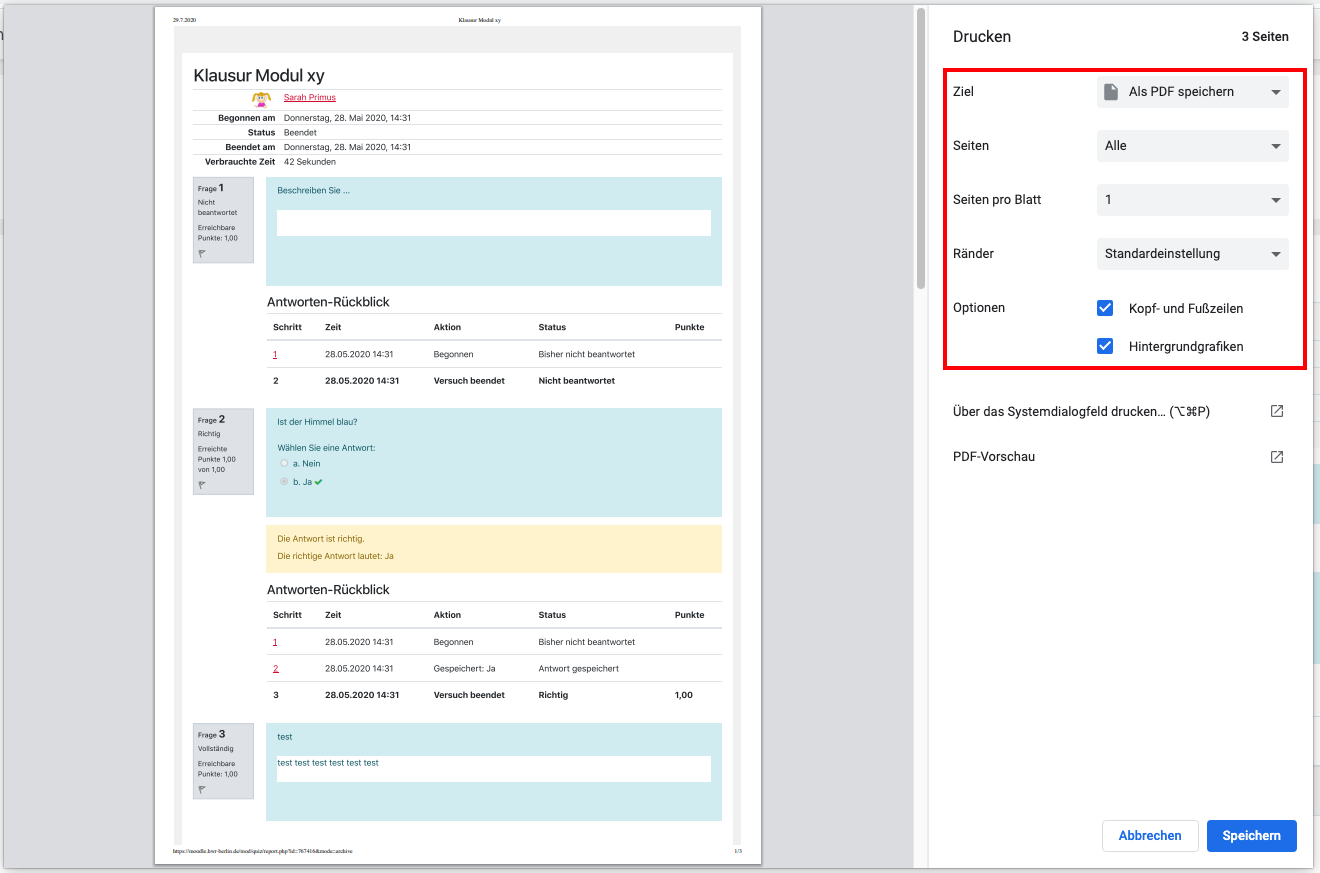
8. Click “Save”, choose a location and give the file a name.
b. Firefox
Click the menu icon with the three dashes in the upper right corner and select “Print…” from the context menu.

In the following window, select the “Page Setup…” button and in the next step, under the “Format & Options” tab, under the “Options” menu item, activate the checkbox in front of “Print background (colors and images)”. Close the window by clicking on “OK”.


Download test overview as Excel file
Navigate to the course where the corresponding quiz activity is located.
Open the quiz activity with a left click and open the attemps overview by clicking on “Attemps: xy“.
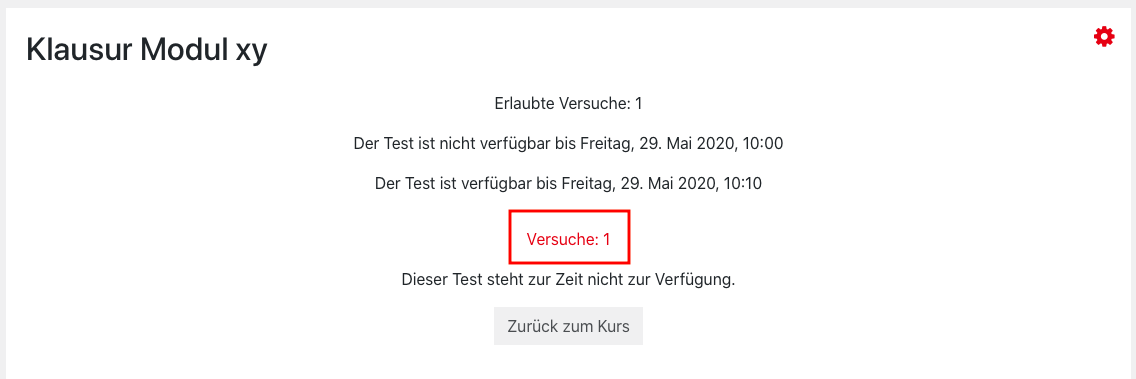
Scroll down to the table. In the drop-down menu next to “Download table data as“, select “Microsoft Excel (.xlsx)“, or a more appropriate file type.
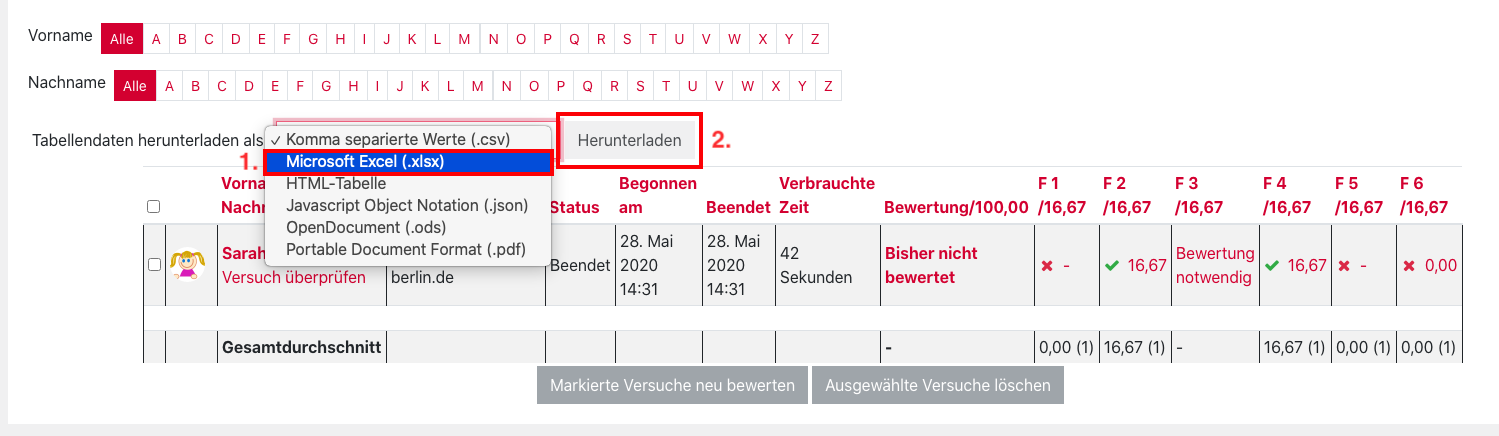
After clicking the “Download” button the file will be generated and downloaded accordingly.