Electronical exams via Moodle – assignment
This instruction includes the preparation (creation of the assignment, minimum settings, submission format, group of participants, compensation for disadvantages), the execution itself (extension of the submission time) and the follow-up (viewing and evaluation, reuse of the assignment) of the activity assignment as an electronic exam.
Preparation
Create an assignment
1. To create an assignment, first navigate to one of your courses via the dashboard. Now switch on editing here via ” Turn editing on“.

2. Select the topic under which you want to insert the assignment and click ” Add an activity or resource” there.

3. A selection window opens where you can select the assignment in the field at the top by clicking on it.

4. You will now reach the configuration menu of the activity assignment. To create this, you must now assign at least one freely selectable name and save the settings.

5. The activity has now been created in the course:

recommended minimum settings
Usually, the following setup is desired for an exam:
The exam assignment is to be available from a certain time x. The upload of solutions is planned for a processing time y. After the end of the processing time (including buffer times), no more submissions should be possible. In order to submit a submission, a declaration of self-sufficiency is to be activated.
Preconfigured settings are marked in blue in the figures.
1. You are on the course interface, navigate to the assignment you want to configure and select it by clicking on the assignment name.

2. In the grading summary you will find the action menu of the activity (red cogwheel) in the upper right corner. Click it and select “Edit settings“.

3. You are now back in the familiar settings screen for the assignment.
4. Below the name of the assignment you will see a description field. Here you can display organizational processes, for example.

5.In the “Availability” section you can regulate the end of the exam time. Under “Due date“, the end of the processing time should be specified. Under “cut-off date” the end of the processing time plus a time buffer of 5-10 minutes (to compensate for technical differences/loading times).
")
6. Under ” Submission types” you will find an option of the same name, where “File submissions” is enabled by default.

7. The settings under “Feedback types” allow different ways of sending participants an assessment of your delivery. Initially, this can always be done as a comment (“Feedback comments”) or annotation (“Annotate PDF”), when a PDF file is submitted.

8. The “Submission settings” control the display of the submission statement. Please also check whether the “Require students to click the submit button” function is deactivated and the attempts cannot be edited again.

9. Under “Restrict access” you can set the start time of the exam. To do this, click on the “Add restriction” button and in the next window on “Date”. The window will close and you will see that a condition has been added under “Restrict access”. Make sure that “must” and “from” are selected and enter the desired start date.


10. You can insert the actual file with the exam questions under “Additional files”. You will find this field at the beginning of the test settings under the description field. You can either simply drag and drop your file into the drag & drop field or upload it via file manager (document icon).

11. Via “Save and return to course” your settings will be saved and you will be redirected to the course view. Clicking on “Save and display” will take you directly to the grading summary.
12. The assignment is then presented in the course as shown:

Require a specific submission format
You can set which file types can be uploaded by students. You can do it this way:
1. Navigate to the assignment in your course and open it by simply clicking on the name. In the grading summary you will find the action menu of the activity in the upper right corner (red cogwheel). Click it and select “Edit settings“.
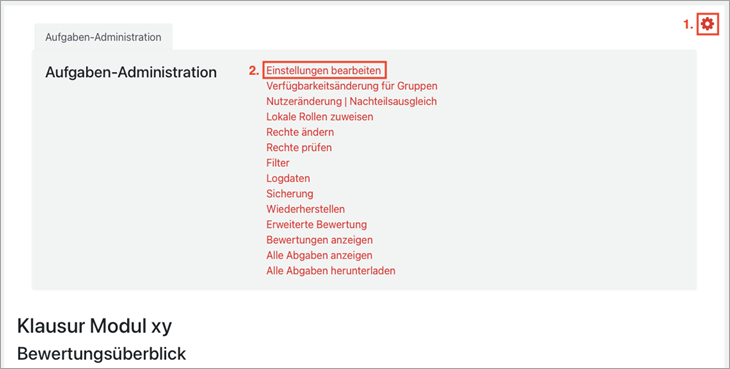
2. Under the menu item ” Submission types” you will find the option “Accepted file types“. Click on “Choose“.

3. In the following window you can allow whole groups of file types or individual formats for upload by ticking them.
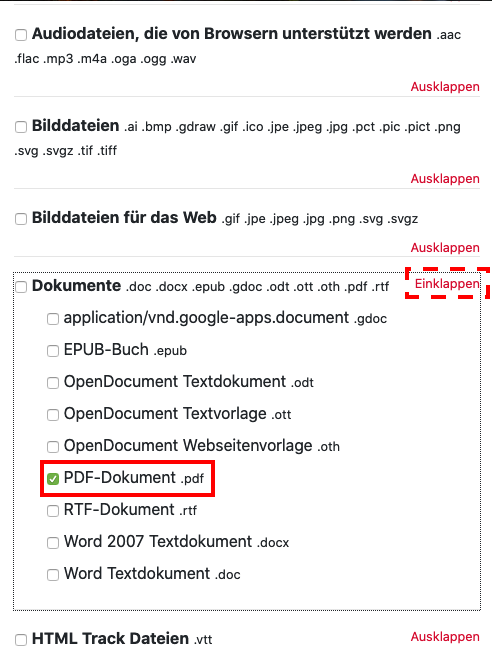
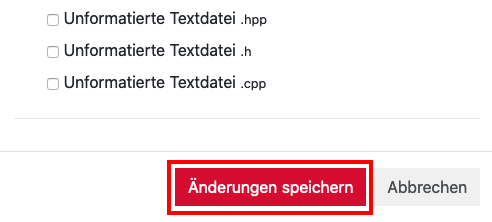
4. Save your choice.
5. You will now see the selected file formats under the “Accepted file types” option.

6. Save the settings of the assignment.
7. The participants receive information in the upload window about which file types are accepted. In order to prepare the participants in the best possible way, it is advisable to make them aware of the accepted file types in advance.

Enable assignment only for a selection of participants
Using the group function in Moodle, you can also open the assignment only for a certain group of participants. This is useful, for example, for make-up exams, cancellations or group exams. To create and define a group, proceed as follows:
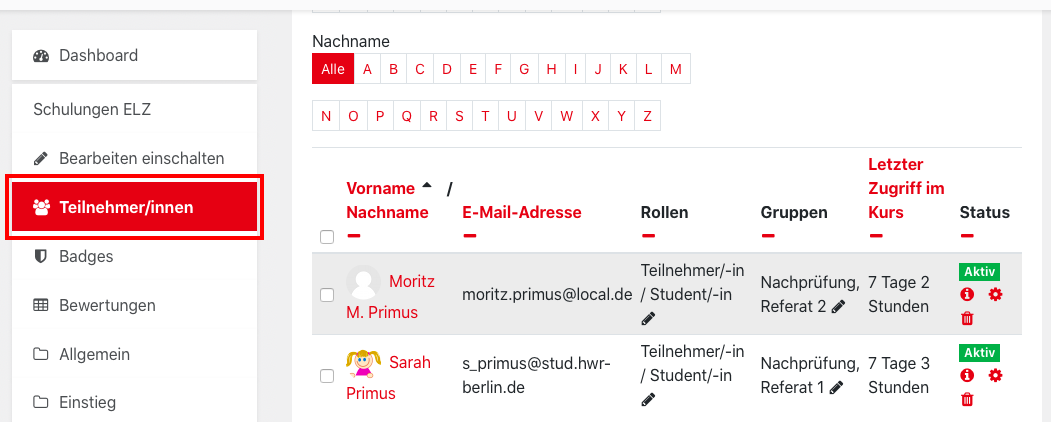
1.Go to the desired course and click on the course action menu (red gear) to the right of the ” Turn editing on” button. In the menu that appears, select the “Users” tab and click on the “Groups” menu item.

2. In the following window click the “Create group” button.

3. On the following page you assign a name for the group, no further settings have to be made, and close via “Save changes“.

4. You will return to the group overview and see the group you just created in the left field. In order to assign participants to the group, click on the corresponding group (it will change color) and select the button “Add/remove users” below the right field of the group overview

5. In the following overview you can see all course participants in the right field. Here you select the desired people by clicking on them (selected entries are colored) and add them to the group via the “Add” button. Members of the group are then displayed in the left field. Saving is not necessary here.

6. Now go back to the course interface and navigate to the assignment that is to receive a group constraint and select it by clicking on the assignment name.
7. In the grading summary you will find the action menu of the assignment in the upper right corner (red cogwheel). Click on it and select “Edit settings“.
8. You are now back in the familiar settings screen for the assignment. Scroll to “Restrict assess” menu item and select “Add restriction“. In the next window, select “Group”.

9. A new condition for groups appears. In the selection list you can now define the group. In combination with a start date, please make sure that the restrictions are linked accordingly.

10. Save your settings.
11. The course view looks as follows under the settings you have made:

1. navigate to the corresponding course and open the assignment in question with a single click on its name.
2. In the “Grading summary”, click on the action menu of the assignment (red cogwheel) in the upper right corner. In the “” Assignment administration” select the element “User overrides”.
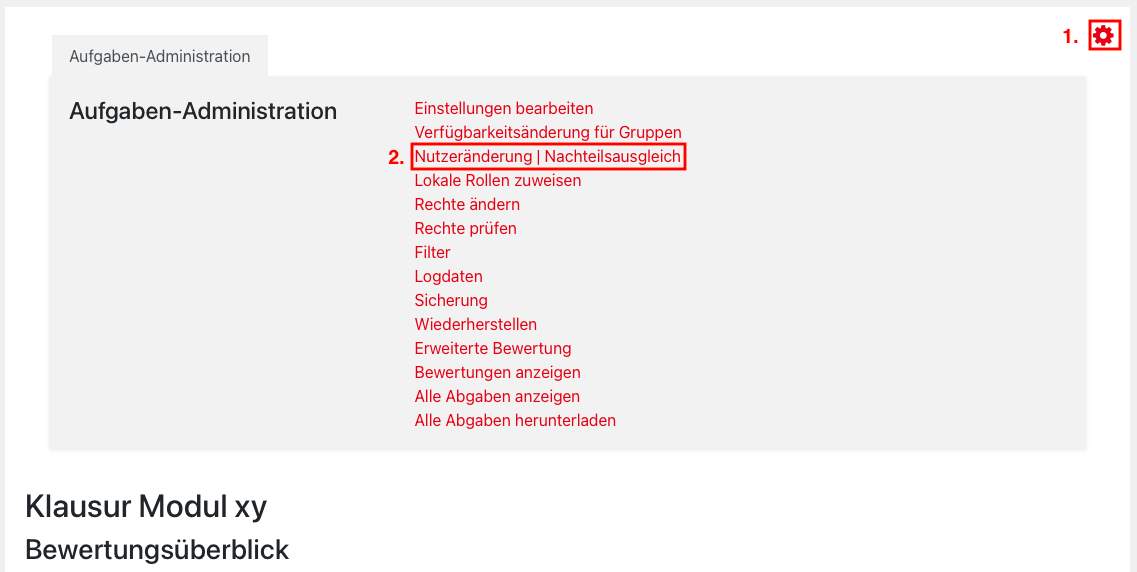
3. In the next window, click on “Add user override” to create a compensation for disadvantages.

4. Via the search field, you can now search for an affected person and select him/her with a click. Furthermore, you have the option here to adjust the time availabilities individually for this affected person. End the process by clicking “Save” or add another disadvantage compensation by clicking “Save and enter another override“.

5. You will get an overview of all created availability changes.
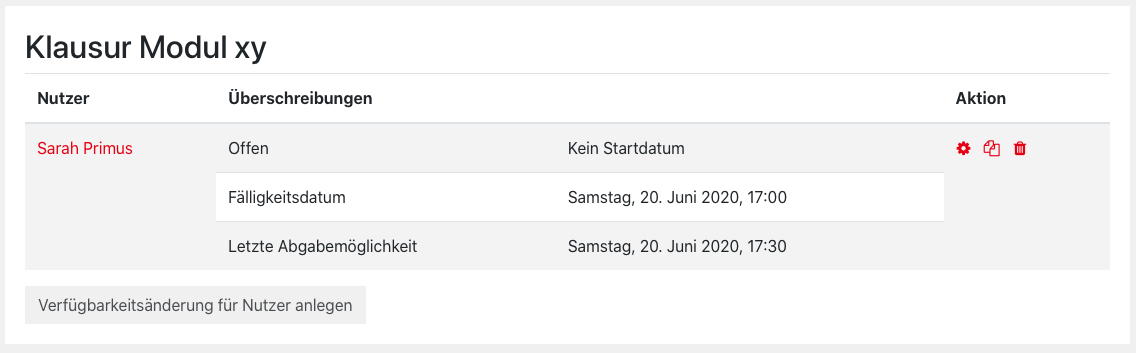
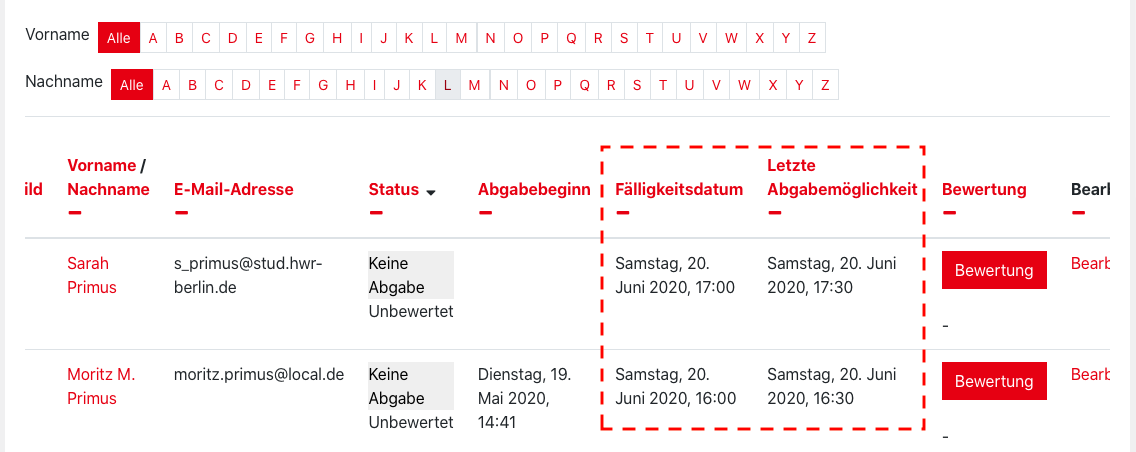
6. Auch in der Abgabenübersicht werden die geänderten Daten entsprechend vermerkt.
Prevent access after end of submission
Unlike the quiz activity, the assignment does not have an integrated mechanism that prevents the assignment from being viewed again after the end of the exam. Thus, without appropriate precautions, it is possible for admitted course participants to download the assignment (provided as a file) again or to view the description text even months after the actual exam.
One way to prevent this is to prevent students from accessing the assignment. This is possible in the following ways:
a) Hide manually
- Navigate to the desired course and turn on the editing mode.
- Scroll to the assignment and click the “Edit” button on the right side of the activity

3. Click the “Hide” option.

4. The selected activity is now no longer visible for participants/students.

b) Automated hiding
- Navigate to the desired course.
- Scroll to the assignment and click the “Edit” button on the right side of the activity. Click the “Edit settings” entry in the drop-down list.

3.Add a new requirement to the assignment by scrolling to the “Restrict access” menu item and selecting the “Add restriction” button.

4. Click on “Date“.

5. Enter the date from which the assignment should no longer be accessible to participants.

6. Save your settings.
7. You can check your configuration on the course interface.

If students are to be able to view their assessment via the assignment activity, access to this assignment is mandatory.
If retrieval of the assignment is undesirable in this context, the following must be done
a) manually remove the assignment file in the assignment settings
or
b) set the “Allow submissions from ” in the time settings of the task to a date which is very far in the future.
Implementation
At the beginning and during the exam, you usually do not need to do anything else. However, it may happen that students have questions. It is recommended to keep a communication channel open for the exam, e.g. an open BigBlueButton room or a forum in the Moodle course. It is also possible to communicate via pre-created Outlook distribution lists.
Via opening the participant view of the course you can keep an eye on the course activity during the exam time.
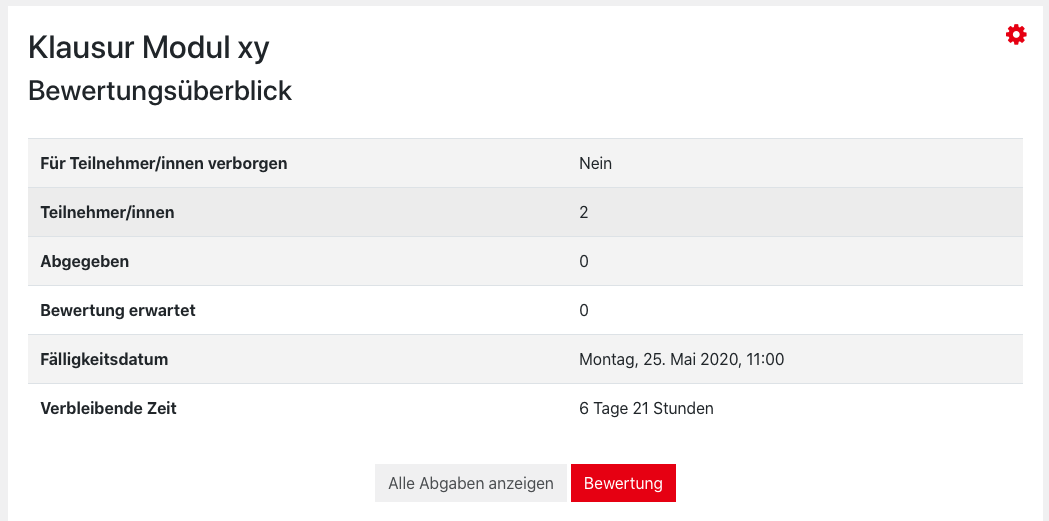
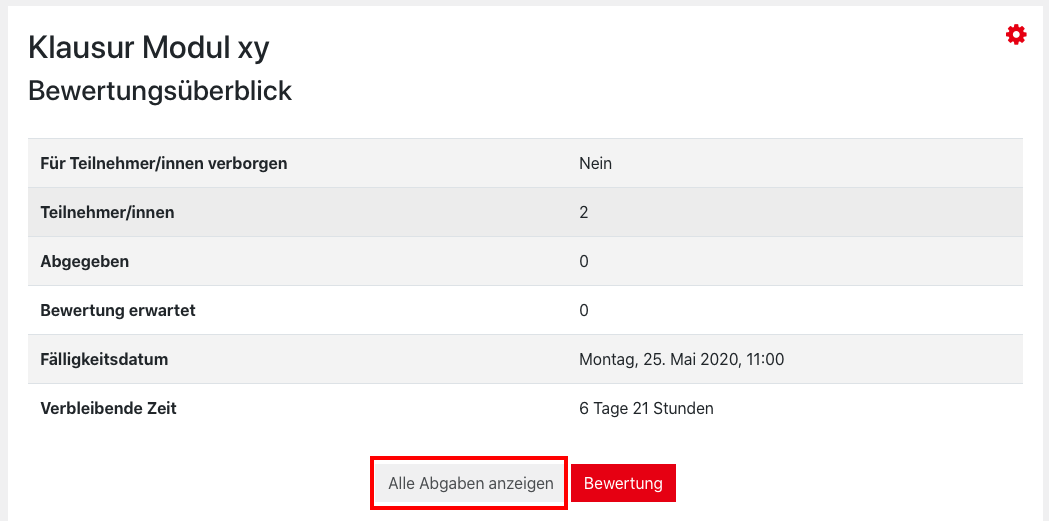
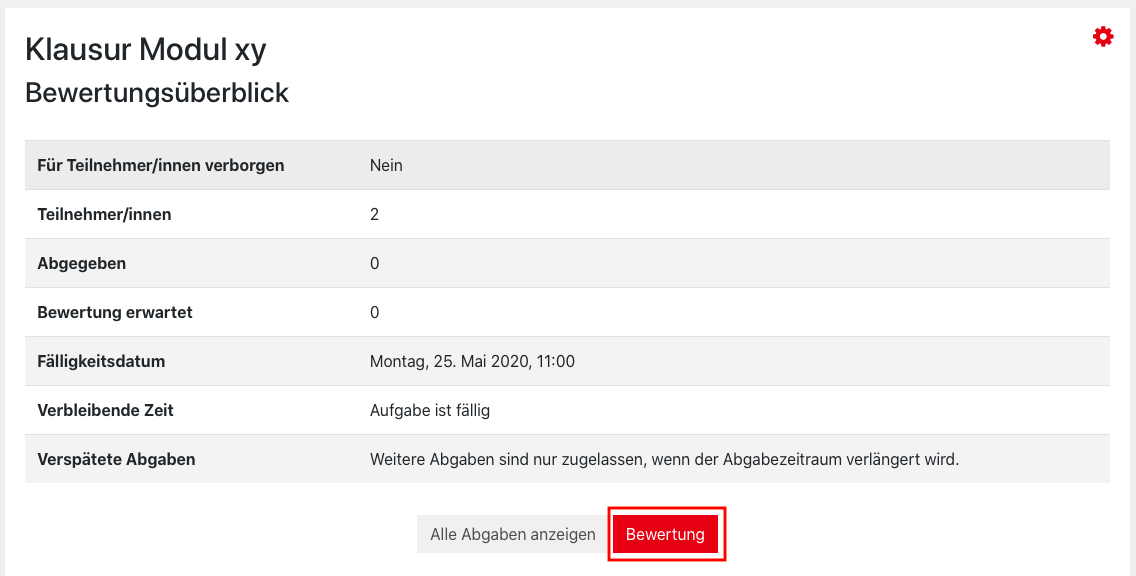
In the grading summary of the assignment, you can see the number of expected and completed submissions. Select ” View all submissions” here to get a detailed view of the submissions.
Extend submission time
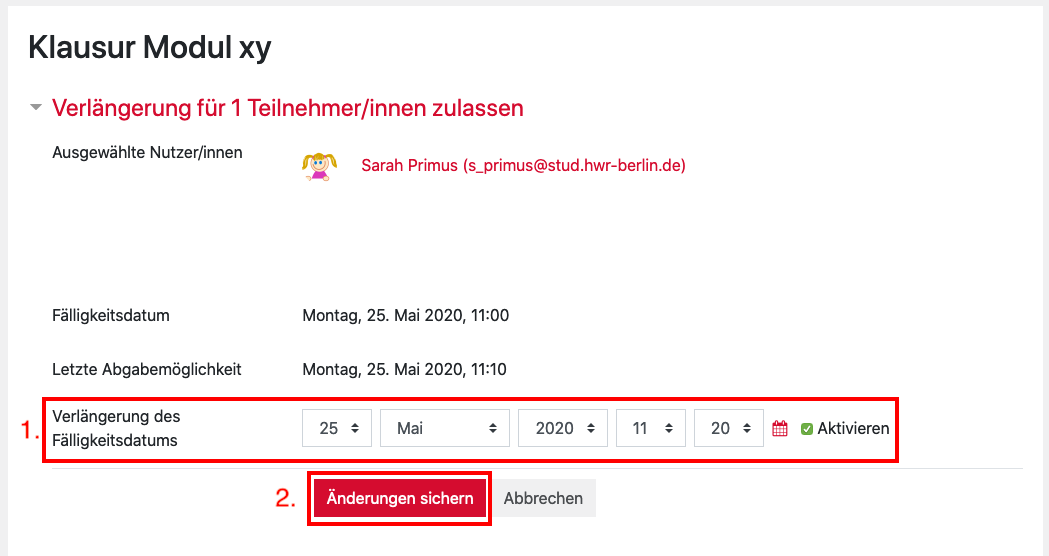
If an examinee has not managed to upload a submission within the set time period for justifiable and comprehensible reasons, you can extend submission times individually. To do this, proceed as follows:
1. In the grading summary of an assignment, select the ” View all submissions” button.
2. Navigate here to the corresponding examinee and select the “Edit” link in the corresponding row in the “Edit” column. Select the ” Grant extension” item in the drop-down menu.

3. Set the changed submission date and exit the mask via “Save changes“.
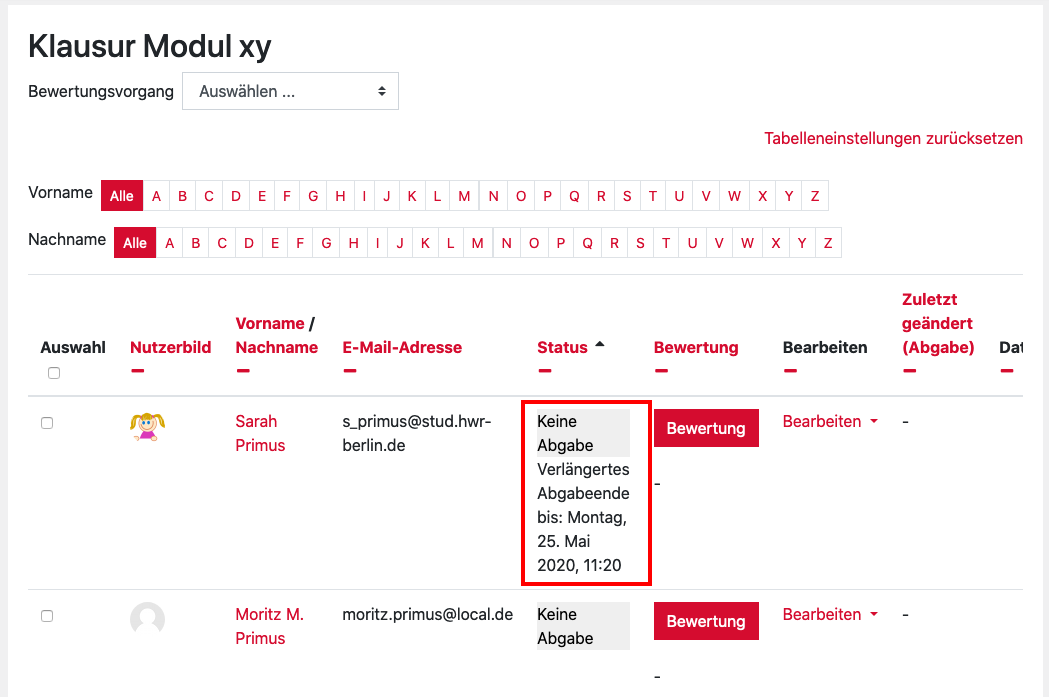
4. The change is recorded accordingly in the submission summary of the task.
Follow-up
In the administrative area of the assignment activity, a submission overview is created where all uploaded documents (file type independent) can be accessed (see ” View Submissions”). For PDF submissions, you can grade directly in Moodle. You can find this and other grading options under “Correct submissions”.
View submissions
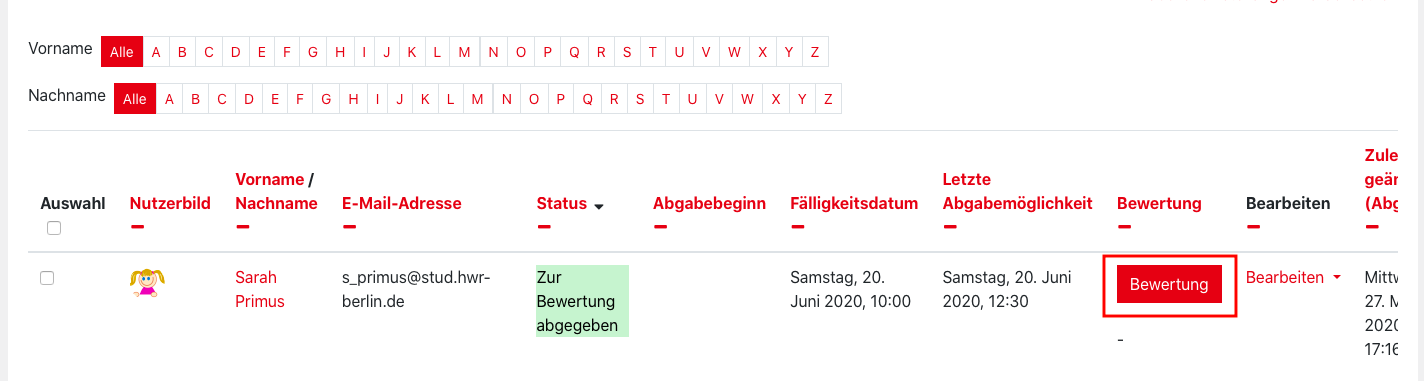
1. You are on the course interface, navigate to the assignment you want to configure and select it by clicking on the assignment name.
- 2. In the grading summary you click on the button ” View all submissions”.
3. The submission overview opens. Here you get detailed data about the submission and an overview of the submitted documents.

4. Wurden PDF-Dokumente abgegeben, können Sie einfach in der Zeile eines Studierenden auf „Bewertung“ klicken.

5. The submission is then loaded directly into Moodle and can be annotated using the toolbar.

6. If other file types were used, you must first download and open the submissions directly on your electronic device.
7. The submissions can be downloaded by selecting them individually …

8. … or collectively.

correct submissions
There are roughly three ways to correct the exam submissions:
a) Directly in Moodle
PDF documents can be loaded and corrected directly in Moodle.
a) Call up the grading summary by simply clicking on the name of the assignment.
b) Select the ” Grade ” button,
c) … or first open the submission overview by clicking on ” view all submissions” and select a “Grade” button there.
d) The submissions will be loaded in a new window and you will have direct access to the content of the document.

Via the header bar (A) you can:
a. navigate back to the course
b. jump to the assessment overview of the assignment
c. switch to the assignment overview
d. see whose work you are currently looking at
e. switch to another submission

Using the toolbar (B) you can:
a. switch document pages,
b. search for comments,
c. open/close all comments,
d. Add notes,
e. set the color of the notes box,
f. move the document,
g. select and move created elements,
h. activate the pen mode,
i. insert different shapes,
j. activate a highlighter,
k. set the highlighter color,
l. activate the stamp mode,
m. set the stamp icon
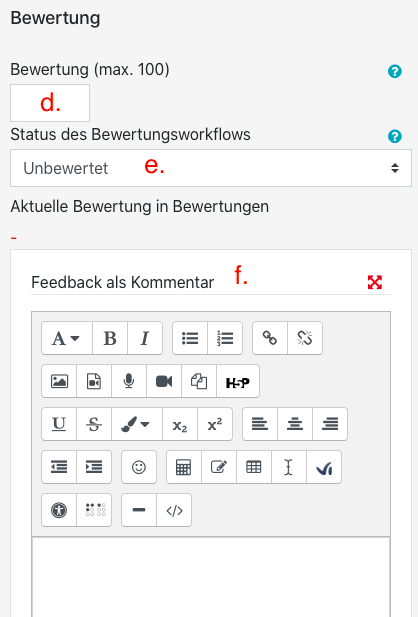
In the right sidebar (C) you will first get information about
a. the evaluation status and submission time,
b. the submitted file
c. added comments
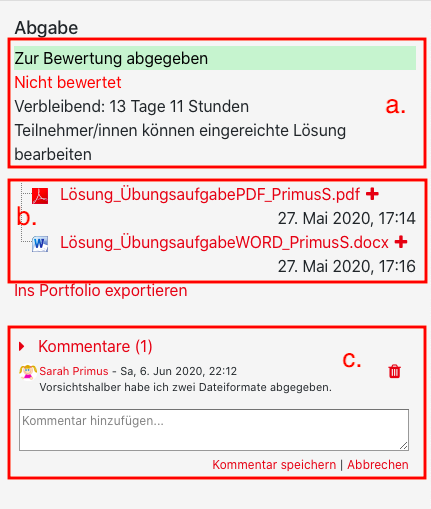
Furthermore, you can:
d. set a grade
e. adjust the grading status
f. add a feedback as a comment
In the footer (D) you can:
a. Save your annotations (ATTENTION: no automatic saving) or reset them.
b. And customize the display mode
c. Make and save all the annotations and grades you want.

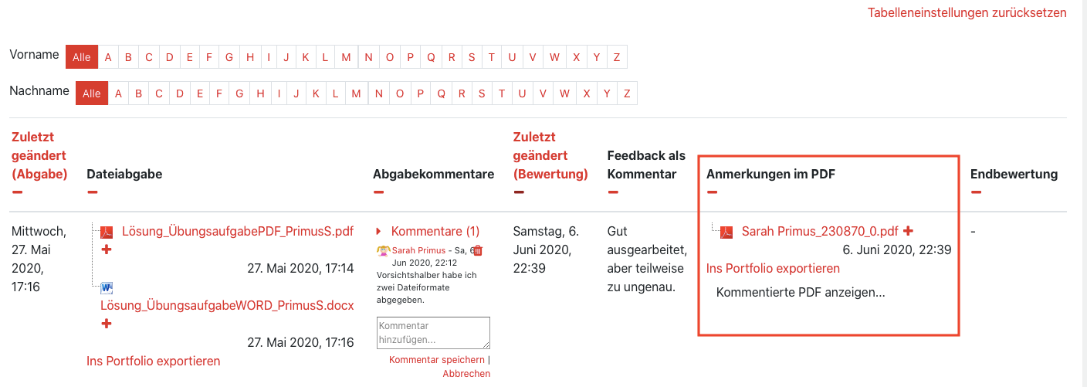
As soon as you have saved, a new PDF document with all your annotations will be created and stored in the “Annotations in PDF” section of the submission overview.
b) Am eigenen Rechner
To do this, the exams must first be downloaded, as mentioned under “View submissions”. Each document must be opened and corrected individually on the computer. If, for example, a Word document has been submitted, this is usually opened in a word processing program and can be corrected using the comment function, for example. PDF documents can be viewed and annotated using Acrobat Reader, for example.
c) Per Hand
Auch hier müssen zunächst alle Abgaben, wie unter „Abgaben einsehen“ genannt, heruntergeladen und auf einem Rechner über eine entsprechende Software geöffnet werden. Die üblichen Dateiformate können i.d.R. problemlos ausgedruckt und, wie bei einer Papierklausur üblich, korrigiert werden.
Share assessment for viewing on Moodle
a) Viewing immediately after the assessment of a submissionYou can share comments, scores, and annotations of submissions for students to view in Moodle. The release can take place both after the assessment of a specific submission of a student, as well as for all or a selection of examination participants at the same time.
a) Viewing immediately after the assessment of a submission
1. Open an assignment and click the ” View all submissions” button

2. Select the student whose submission you want to grade and click “Grade” in the appropriate row.

3. Perform a grading (see section “Correct submissions”).
4. Now set the “Marking workflow state ” on the right side margin to “Released“.

5. Once you select “Save changes” or “Save and show next” the grading is shared for this student to view on Moodle. Activate “Notify students” if you want the student to be informed about the release by email.

b) Viewing for one or a selection of examinees at the same time
1. Open an assignment and click the ” View all submissions” button.

2. Select the student(s) whose submission you want to evaluate by checking the checkbox in the corresponding row.

3. Scroll to the end of the submission overview and select “Set marking workflow state” in the drop-down menu next to “With selected…”. Confirm your selection by clicking on “Go”.
4. Confirm the small pop-up window with “Ok”.
5. In the drop-down menu next to “Marking workflow state”, select the option “Released”.
6. Select “Yes” for “Notify participants” if you want the student(s) to be notified of the release via email.

7. To complete, click on “Save changes“.

c) Viewing for all test participants at the same time (manually)
1. Open an assignment and click the ” View all submissions” button.
2. Activate the checkbox under the column heading ” Select“.

3. Scroll to the end of the submission overview and select “Set marking workflow state” in the drop-down menu next to “With selected…”. Confirm your selection by clicking on ” Go”.
4. Confirm the small pop-up window with “Ok”.
5. In the drop-down menu next to “Marking workflow state”, select the option “Released”.
6. Select “Yes” for “Notify participants” if you want the student(s) to be notified of the release via email.
7. To complete, click on “Save changes“.
d) Viewing for all exam participants at the same time (scheduled)
1. Select the course that contains the corresponding assignment.
2.Click on “Grades” on the left side of the page.

3.Select the ” Setup ” tab here.

4. Select “Edit“>”Edit settings” next to the corresponding assignment.

5. In the next window, click on “Show more…” to display all menu items.

6.Tick the checkbox in front of “Hidden“.
7. For the “Hidden until” option, set any date from which the assessment should be displayed to the students and then select “Save changes“.

8. Now open the corresponding assignment by clicking on it and select the ” View all submissions” button.
9. Activate the checkbox under the column heading ” Select“.
10. Scroll to the end of the submission overview and select “Set marking workflow state” in the drop-down menu next to “With selected…”. Confirm your selection by clicking on ” Go”.
11. Confirm the small pop-up window with “Ok”.
12. In the drop-down menu next to “Marking workflow state”, select the option “Released”.
13. Select “Yes” for “Notify participants” if you want the student(s) to be notified of the release via email. Note: The students will receive the mail immediately, even if the insight will be shown at a later time (cf. 1.).
14. To complete, click on “Save changes”.
Reuse of an assignment in another course
You can reuse a assignment once it has been created in other courses. This works as follows:
- Navigate to the course into which you want to copy or import an assignment.
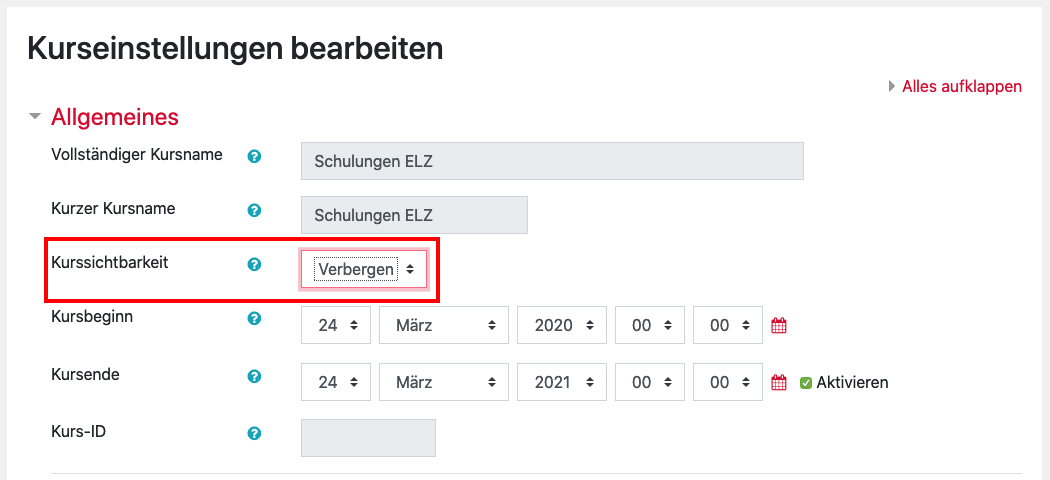
2. Set the course to “Hidden” for the time of the copy process. To do this, open the course administration (red gear at the top right) and select the “Edit settings” option under the “Course administration” tab.
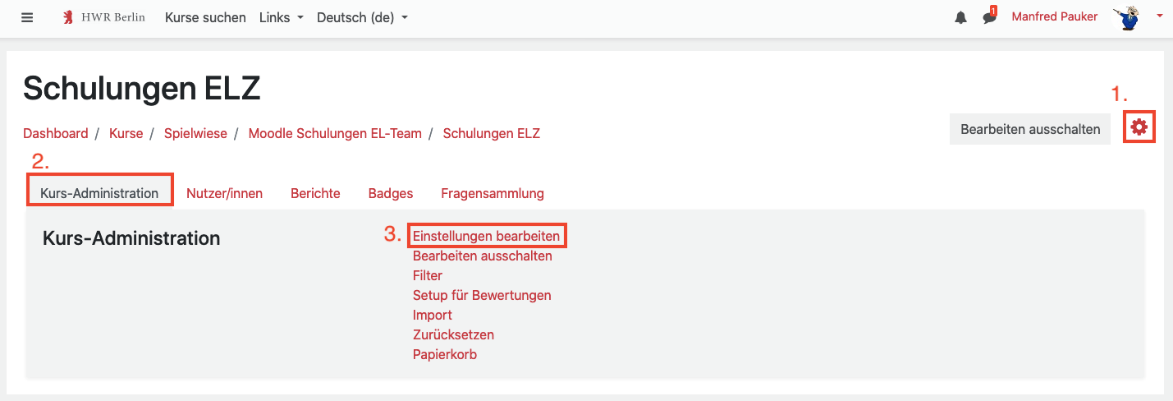
3.Here, go to “Course Visibility” and select ” Hide” from the drop-down list.
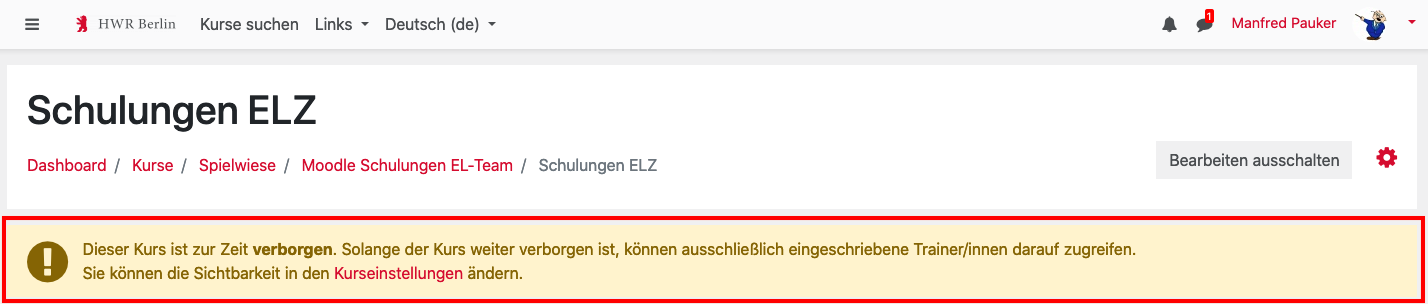
4. Back on the course overview you will now see a banner regarding the course visibility.
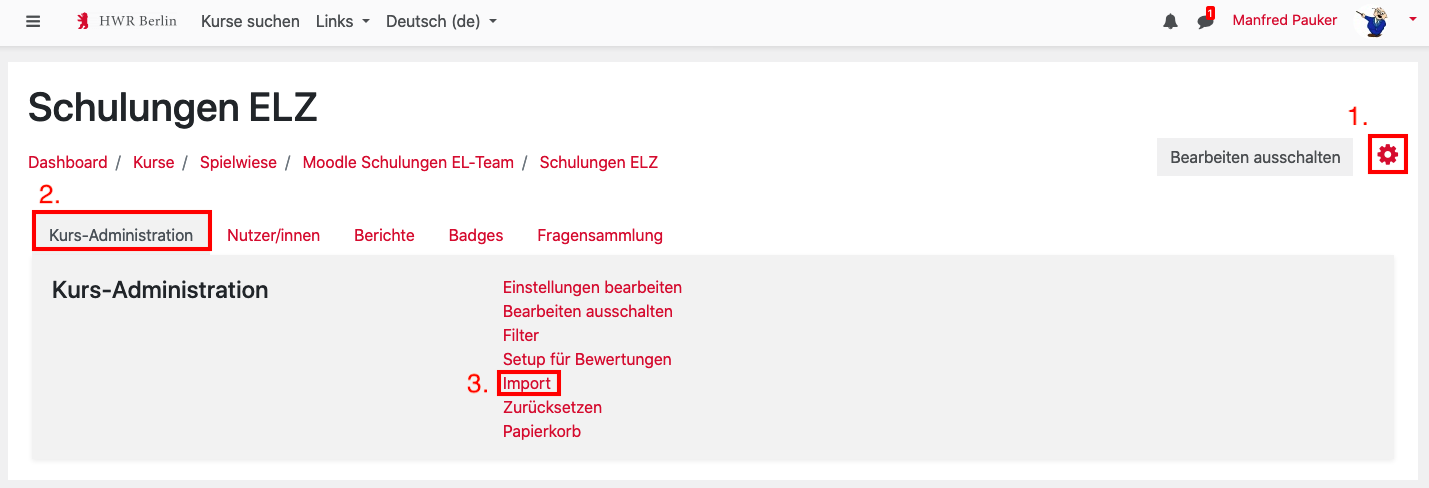
5. Open the course administration again and select “Import” under the “Course administration” tab.
6. In the following window, select the source course using the search field and then select the corresponding course from the list. Click on ” Continue “.
Tip: Open the source course in another tab beforehand, copy the course abbreviation and paste it into the search field.
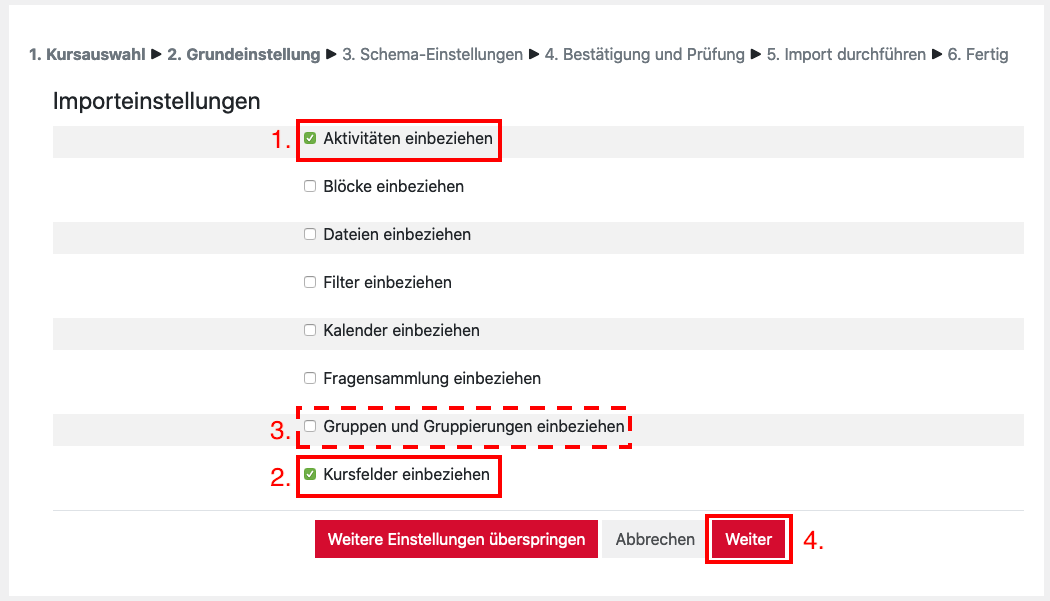
7. Now select what you want to import. For an assignment without a group requirement, the options “Include activities and resources” and “Include custom fields” are recommended. Confirm your selection with “Next“.
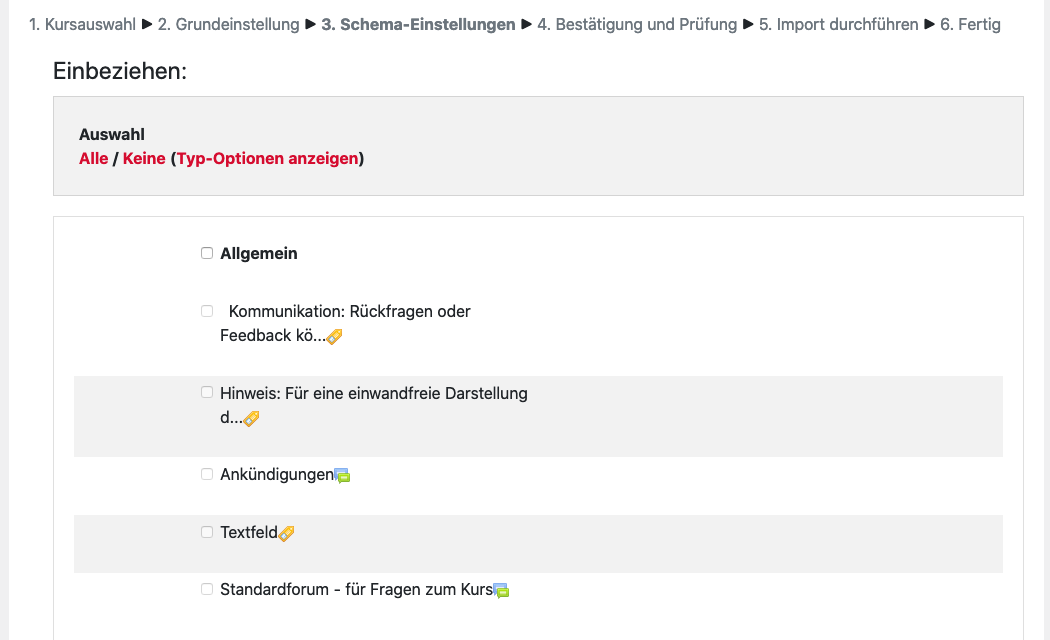
8. You can then select the activities/work materials that you want to copy. Via “Next” you will get to the item “Confirmation and review“.
9. In the next step you will get a summary of your selection. Via the button “Perform import” the copying process is started.

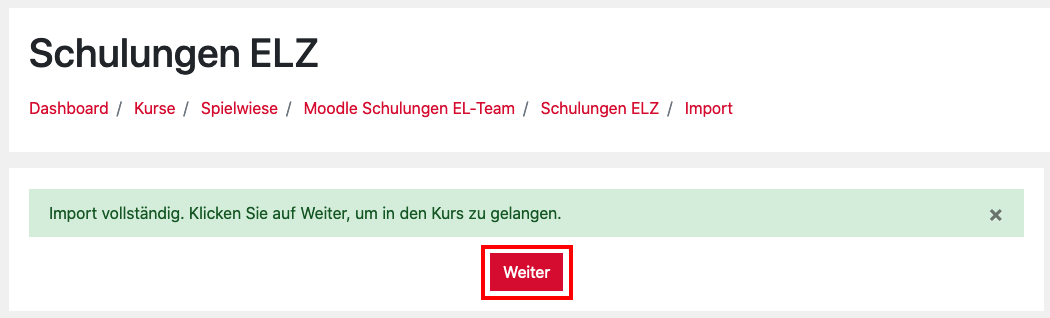
10. The selected elements are now copied to the target course. If the import was successful, you will receive the following message. Confirm this with “Next“.
11.The contents of the source course are now available in the target course.
12. If necessary, adjust the time settings of the assignment accordingly (see section “Recommended minimum settings”).
13. Make the course visible again. To do this, you can follow steps 2 to 3 analogously or click on “Settings” in the hint banner.
Export graded submissions
If you want to download the submissions as well as your grading on them, follow these steps:
1. You click on the cogwheel icon at the very top right next to the course name to enter the course settings.
2. You click on the tab “Reports“.
3. Then you select the “Assignment submission report“.

4. There you will now see the assignments of your course listed. Pick out the desired assignment – in our example it is the “Exam Example 1” – and then click on “Download“.

5. Now you can choose which files you want to download – by default all are marked:
- Under “Submissions” you will find all the students’ submissions.
-
- You have “Feedback Files” if you have uploaded files with your comments during the grading process.

- “Feedback Comments” means the comment function that you could use in the grading process.
- “Annotated PDFs” you have used if you have written your comments directly in the PDF.
If you did not use the comment function, for example, then you can remove the checkmark from “Feedback Comments”.
6.Click on “Dump files“.

7. Now select a file location and give the folder a name or use the automatically generated name.
8. You will now find the folder under the specified location.

9. When you open the folder, you will see an overview of folders – one folder was created for each participant.

10. If you click on a participant folder, you will also find several folders there – depending on which files you have selected (see point 5). For example, you will find annotated PDFs in the corresponding folder as PDF. Comments can be found under “feedbackcomments” as html file. If required, the html file can be converted to PDF by printing.
