
This post will not argue, if theses writing in LaTeX or in Word is better. It would also not stress on the beauty, advantages and disadvantages of the document markup language (prounounced lah-tech). Its main purpose is to provide a template, with instructions for those, who would like to start writing in LaTeX as quickly as possible. As such, the post doesn’t strive to teach, how to create (the original KOMA Script guide is in German) or modify templates. It only provides a snapshot, which could be (almost) instantly applied.
Oviously, before using LaTeX, one should first get it. For i have only worked with it on windows, this is the platform for which the following instructions apply. However, googling provides enough sources for both linux and mac users.
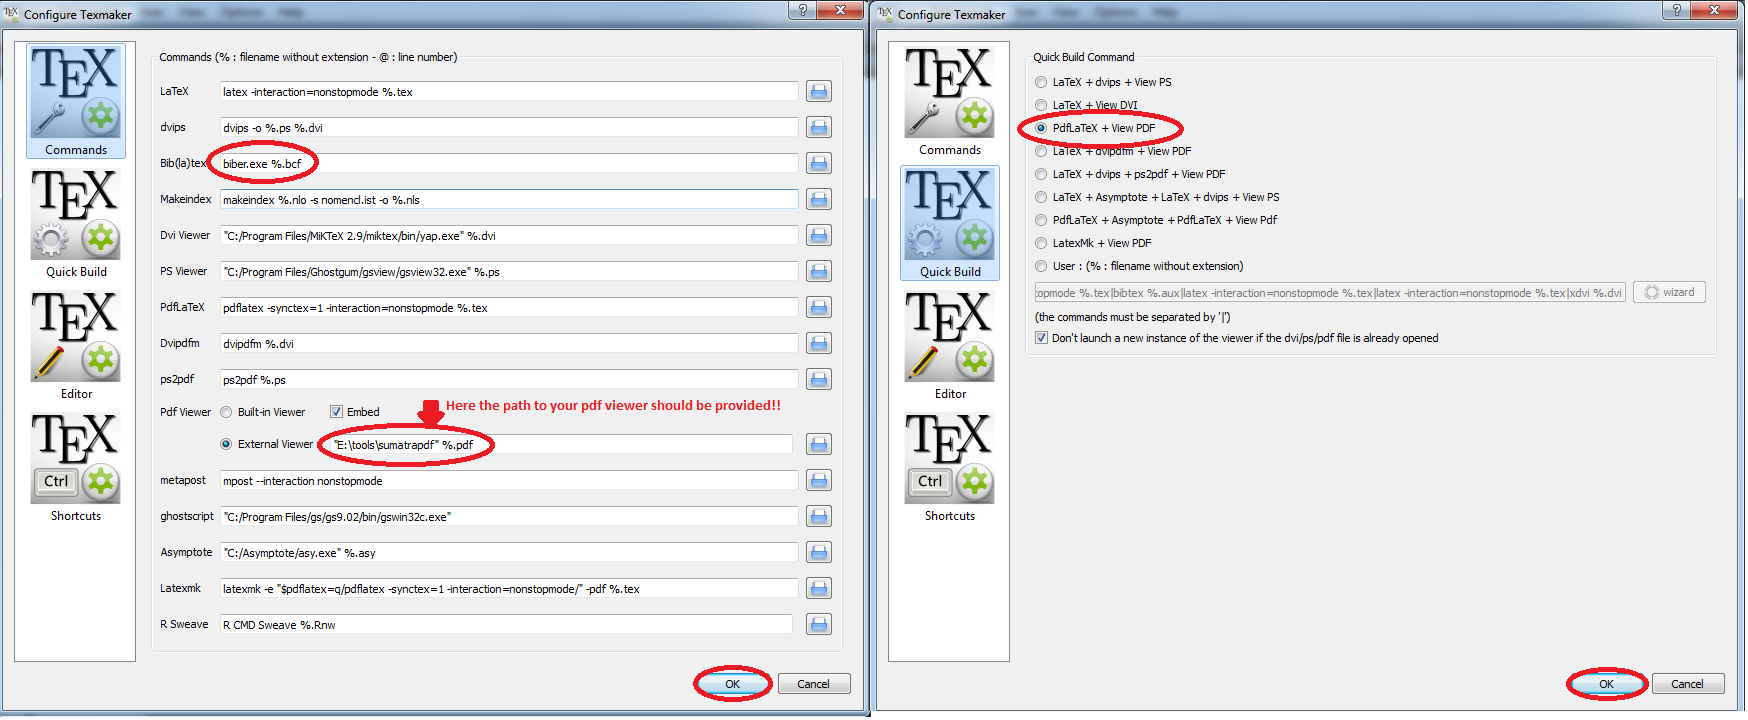
Installing MiKTeX is pretty straightforward, after which one should think about suitable editor and pdf viewer, such as texmaker and sumatrapdf. The last one allows refreshing of existing pdf files, which is very useful for overviewing theses in progress.Aftert installing and setting up the recommended software, you should be able to use the unofficial BSEL LaTeX template. Before illustrating the template’s functions, one final installation step should be implemented. The „biblatex.cfg“ file in the archive, containing settings for the citation and bibliography formats, should be moved to the respective MiKTeX folder. In my case this was:
„C:\Program Files\MiKTeX 2.9\tex\latex\biblatex“.
You could also search for the file in the folder of your LaTeX installation, for there should already be a default one. Back it up, before moving the „biblatex.cfg“ from the template archive and you are good to go!
This mind map summarizes the structure, content and functionality of the template and here you’ll find an example of what it produces. As in generally every LaTeX document, the layout is specified in the preamble, the place between lines 1 and 331 of „thesis.tex“ in the template. The table of contents, lists of abbreviations, figures and – tables, as well as the bibliography are created automatically. Font size of different elements, such as chapter and section headings, are also standardized. Thus, the author is enabled, after initial familiarization with LaTeX and the template, to concentrate on the content of a thesis, without any layout concerns.
The template provides also two title page designs. The first one inserts two logos in the header. In case you are writing your thesis with a company you may find this option more appealing. The second design style simply prints the name of the school. It make sense to comment out the one you are not going to use on lines 1 or 2 from the „pre-text.tex“ file. Commenting out is done simply by inserting a „%“ in front of a line. The default option is
„%\input{./chapters/titlepage.tex}% inserts title page without logos
\input{./chapters/titlepage_logos.tex}% inserts title page with logos“
and if you choose a title page without logos, your „pre-text.tex“ file should start with
„\input{./chapters/titlepage.tex}% inserts title page without logos
%\input{./chapters/titlepage_logos.tex}% inserts title page with logos“.
The template uses LaTeX default layout options, not only for the sake of aesthetics. More insides on the topic are provided in the second chapter of the KOMA-Script guide. It is therefore advisable to ask your supervisor, if (s)he would accept those default options. In cases, where different page margins are required, as for example those specified in the HWR Bulletin for Writing Scientific Works (in German), the template has to be adjusted. This is done on line 25 of the „thesis.tex“ file.
„%\usepackage[left=35mm, right=15mm]{geometry}“ -> „\usepackage[left=35mm, right=15mm]{geometry}“
This code would set 3.5cm left margins and 1.5cm right margins for the whole document. Please note, you should subsequently remove also the comments from lines 1 and 22 of the „titlepage.tex“, or „titlepage_logos.tex“ respectively, for you would probably prefer that those margins do not apply for your title page.
„%\newgeometry{left=35mm, right=35mm}“ -> „\newgeometry{left=35mm, right=35mm}“
…
%\restoregeometry““ -> „\restoregeometry“
On line 40 of „thesis.tex“, the document languages are chosen. The last language is the default one, thus if you will be writing in German, but some parts of the documents would be in English, you’ll have change the default line.
„\usepackage[ngerman,english]{babel}“ -> „\usepackage[english,ngerman]{babel}“
Switching between language environments is illustrated in the following example.
\selectlanguage{ngerman} Dieser Text ist auf Deutsch und LaTeX nutzt die Deutsche Silbentrennungsregeln. \selectlanguage{english} This text is in English and LaTeX uses the respective hyphenation rules.
On line 66, the font is chosen and if you decide to switch to the default one, you should just comment out the respective line.
„\usepackage{mathpazo}“ -> „%\usepackage{mathpazo}“
Between lines 99 and 103, the style of the title page with logos in the header is defined.
„\deftripstyle*{titlepagestyle_logos}% defines a new titlepage style with logos
{\includegraphics[height=1.35cm]{./chapters/figures/logo_company.png}}% inserts logo in the left header
{}% central header is empty
{\includegraphics[height=1.35cm]{./chapters/figures/logo_hwr.jpg}}% inserts logo in the right header
{}{}{}%used for modifying respectively the left, central and right footers“
On line 160, the location of your bibliography is specified. Please note, the bibliography should be in the same folder as the „thesis.tex“ file or in a sub-folder. In the template’s case, it is called „bibliography.bib“ and is located in the „chapters“ sub-folder.
\bibliography{./chapters/bibliography}
Between lines 288 and 300, hyphenations exceptions are introduced for some special cases. They apply also for the bibliography. For example
Sve-ri-ges
will hyphenate the word on the two positions, marked with „-„. Of course, this happens only if the word needs to be hyphenated.
Similarly, the same is done for words in German language environments between lines 298 and 300.
The last part of the preamble, between lines 315 and 331, provides general characteristics of the document, such as, school name, thesis type, author, supervisor, etc. There you should just switch the examples with the parameters of your thesis.
„\renewcommand*{\author}{Autor’s Names}“ -> „\renewcommand*{\author}{Your Names}“
Afterwards, the elements (introduction, conclusion, etc.) of the thesis, per se, are inputted into the document environment.
\begin{document}
…
\end{document}
The content of a „*.tex“ file, created with any text editor, after saving it in the template’s folder or sub-folder, could be similarly inputted into the document’s environment.
\input{./chapters/new_file.tex}
Finally, let us have a look at the compilation of the document, or in other words the process which synthesizes the template’s components into the final pdf.

Image: https://www.linux-user.de/
As clarified by the image, it has several steps, which basically means, you should execute several commands in order to get the final „thesis.pdf“. Though, it may seem a bit complicated, it only implies you have to push several keys on your keyboard. If you are using texmaker you need to press
F2: LaTeX – to indicate to the program, everything it needs to consider;
F12: MakeIndex – to create your list of abbreviations;
F11: BibTeX – to get the necessary information from your bibliography file;
F2: LaTeX – to prepare the whole document
F1: Quick Build (which as showed in the texmaker „setting up“ link above initiates the F6: PDFLaTeX command) – to get the final document.
Note, that you have to use „F11“ and „F12“ only in case you have updated your list of abbreviations and/or have cited some new sources. For the implementation of some written paragraphs, just pressing „F1“ should be enough. Furthermore, sometimes you may get an error message, after pressing „F11“. Before consulting the internet, try deleting in windows the contents of the following temp folder.
C:\Users\(YOUR USER)\AppData\Local\Temp
Well, that is basically it! Feel free to modify and adapt the template to your own purposes. Comments for almost every line of code in the „tesis.tex“ file have been provided, which should help you find the necessary information, as quickly as possible. However, be advised that some adjustments, may demand a considerable amount of time.
Please, also share your experience and especially the problems you encounter with this template in the comments. Generally, keep in mind that every question about LaTeX you may have, has probably been already answered on the net.

0 Kommentare